
Complete your business setup before starting operations
Prepare your business for free, review your setup, and understand when a paid subscription and booking-site publication are required.
New accounts begin in a focused setup flow. Creating your account and preparing your business are free. Running new rental operations requires a verified paid subscription. There is no ongoing free operating plan for new accounts.
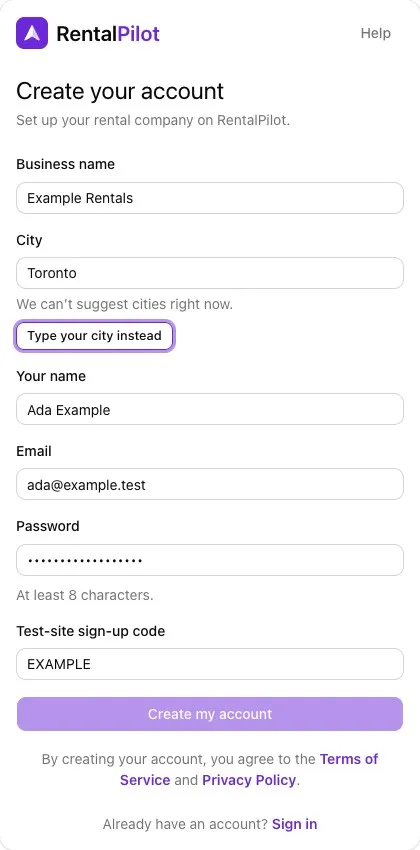
New sign-up asks for your business name, city and your name. Start typing the city and choose a match in Canada or the United States. If suggestions are unavailable or your city is missing, choose Type your city instead, then select Canada or the United States and its province or state. RentalPilot keeps that structured place so the first branch starts in the right country and region. Your city also sets the currency your renters pay in: Canadian dollars for a Canadian city, US dollars for a US one. It can’t be changed later, because your rates, fees and bookings are saved in it. Your RentalPilot plan is always billed in US dollars. Existing businesses keep their saved countries, currencies and agreements.
If sign-up fails, correct the field and try Create my account again. Changing a field clears the previous error, including an error that arrives after you edited a slow submission. Your next attempt shows its own result.
1. Prepare your business
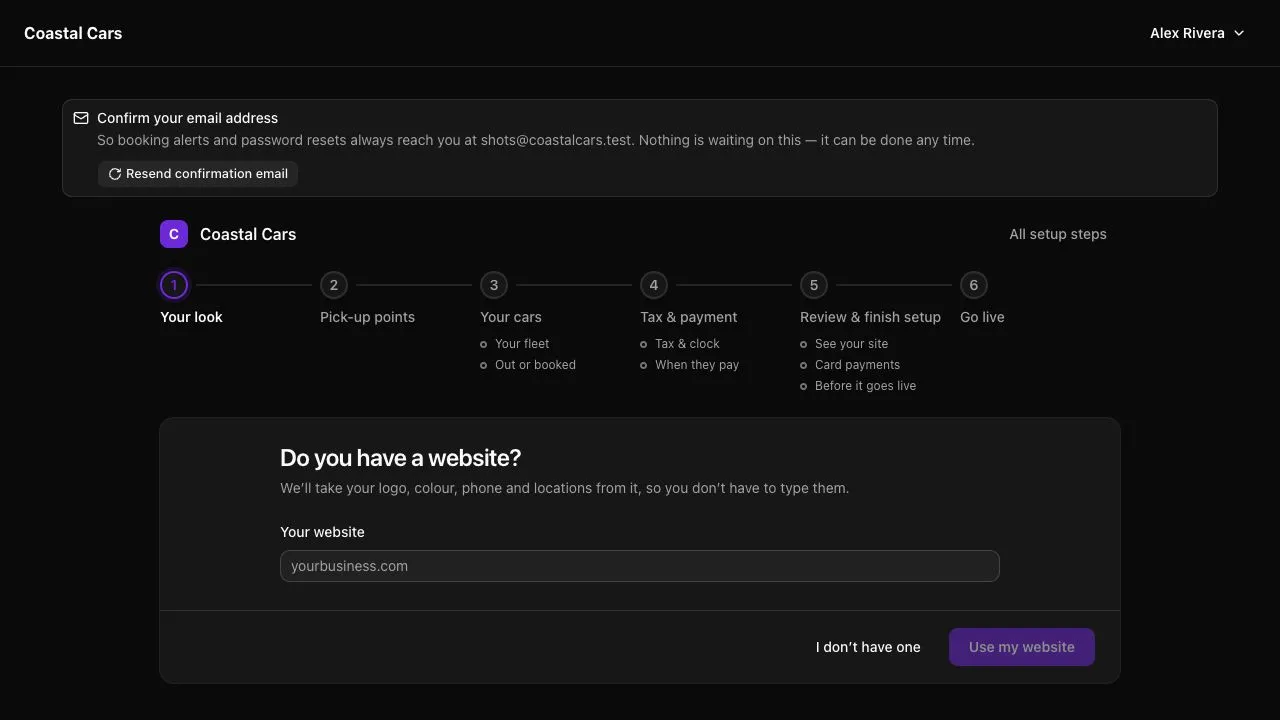
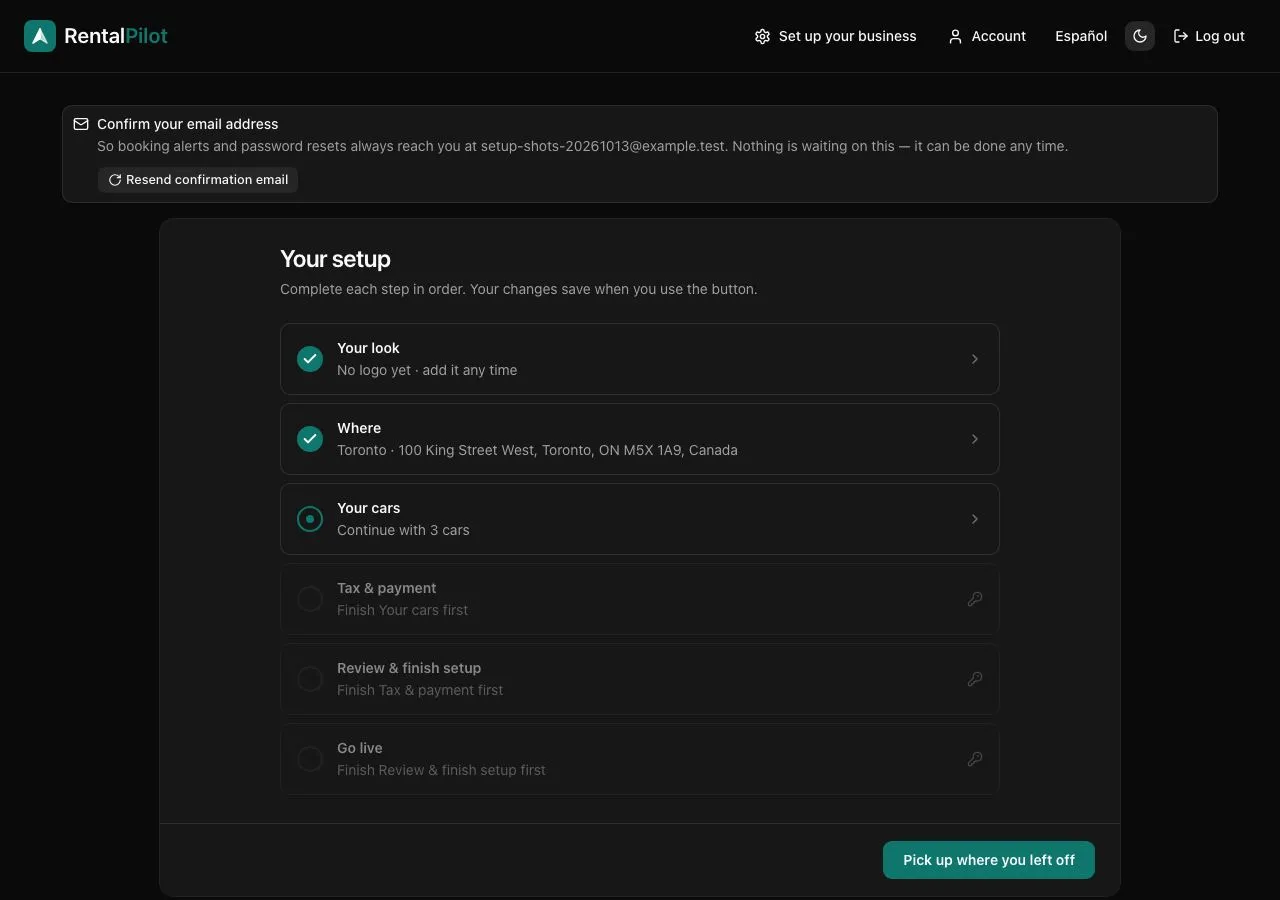
Setup is organized into six saved stages: Your look, Pick-up points, Your cars, Tax & payment, Review & finish setup, and Go live. The setup list shows what is finished, what you are working on, and what opens next. Typing is kept as a draft while you work; a screen’s answers count only when its button succeeds. If a warning says your typing cannot be kept, leave the page open and save that screen before leaving. You can reopen a finished stage from the list; if you change something there, setup walks you through the stages after it again, keeping everything you entered. If you change nothing, saving takes you straight back to the list. Wherever we can, each question arrives already answered from something we know, so your job is mostly to check it. Help opens answers for the screen you are on without leaving your entries.
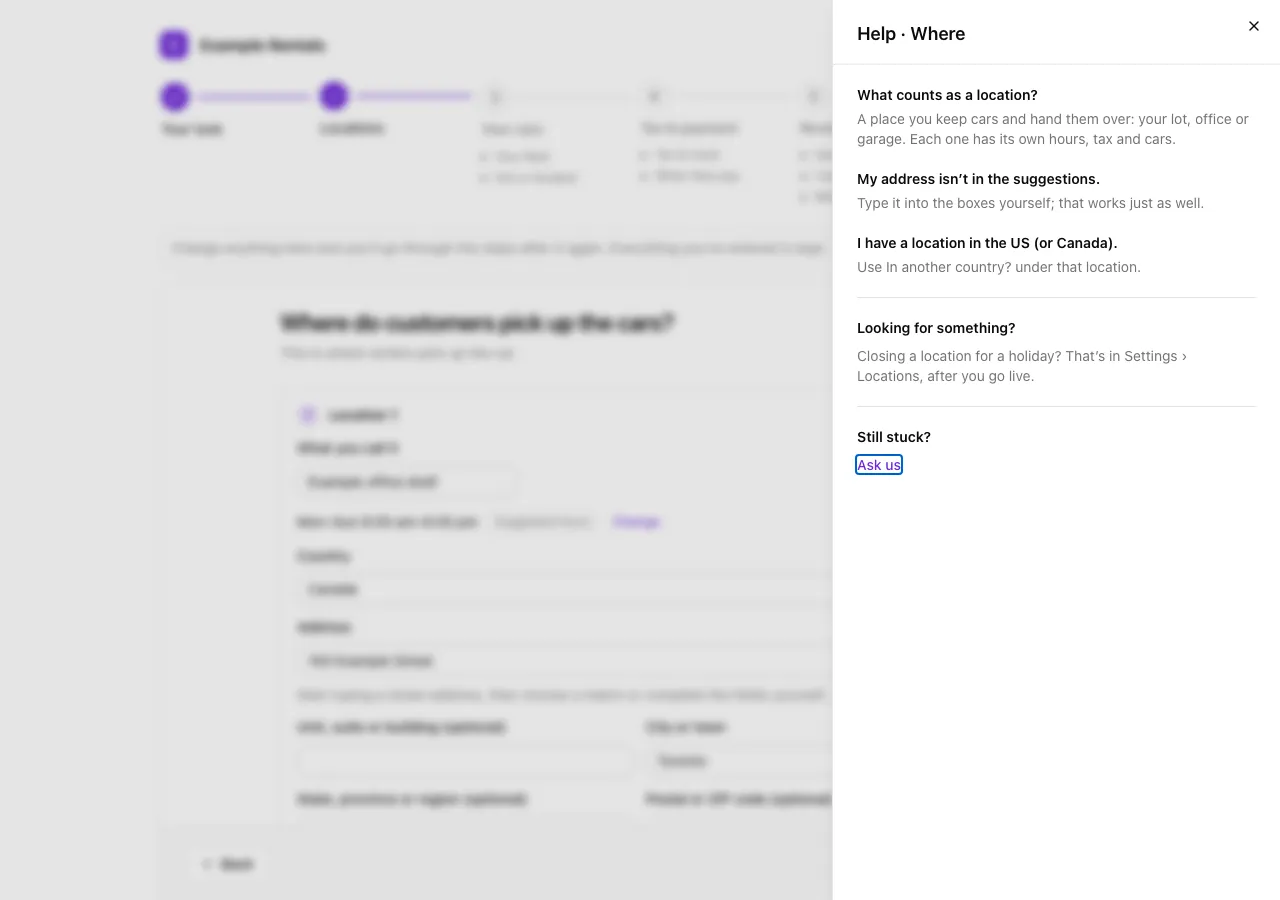
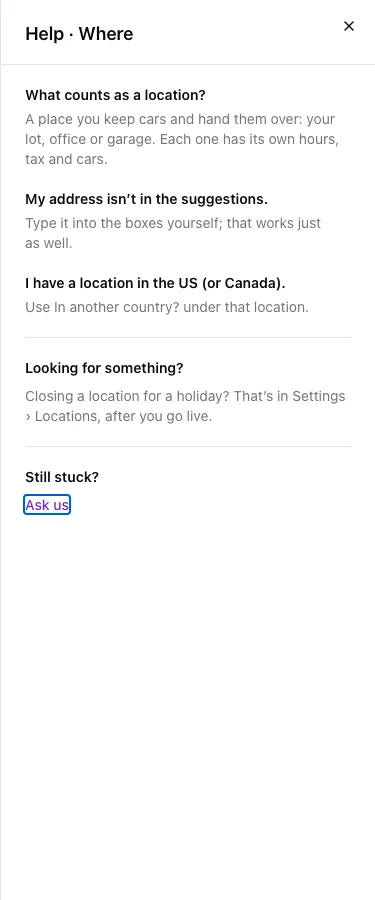
Help while you set up. Select Help at the top of a setup screen, beside All setup steps (or Setup list on a phone). The panel answers questions about that screen. When shown, Looking for something? explains where related features live or what becomes available after you go live.
The panel opens on the right on a computer and fills the screen on a phone. Close it with × or Escape to return to your entries. Under Still stuck?, Ask us opens a message in your email app with the current setup screen in the subject. Review and send that email yourself. The screenshots below show the current English interface with fictional business details.
Your look. First we ask whether you have a website. Choose Use my website and we read your logo, colour, phone number and locations from it, then show you what we found: Yes, that’s us keeps it (and fills in your address in the next step), Not quite takes you to add your logo yourself. If you don’t have one, choose I don’t have one. Otherwise, drop your logo (a PNG, JPEG, HEIC photo or PDF) and we take your colour from it. Check it — pick the suggested colour, another colour from your logo, one of the common brand colours, any colour with the colour box, or (in browsers that support it) Pick a colour from your screen — then choose Use this logo, Try a different file, or I’ll add one later. If you skip it, the go-live screen reminds you with Add it now. You can change the colour any time in Settings → Booking site.
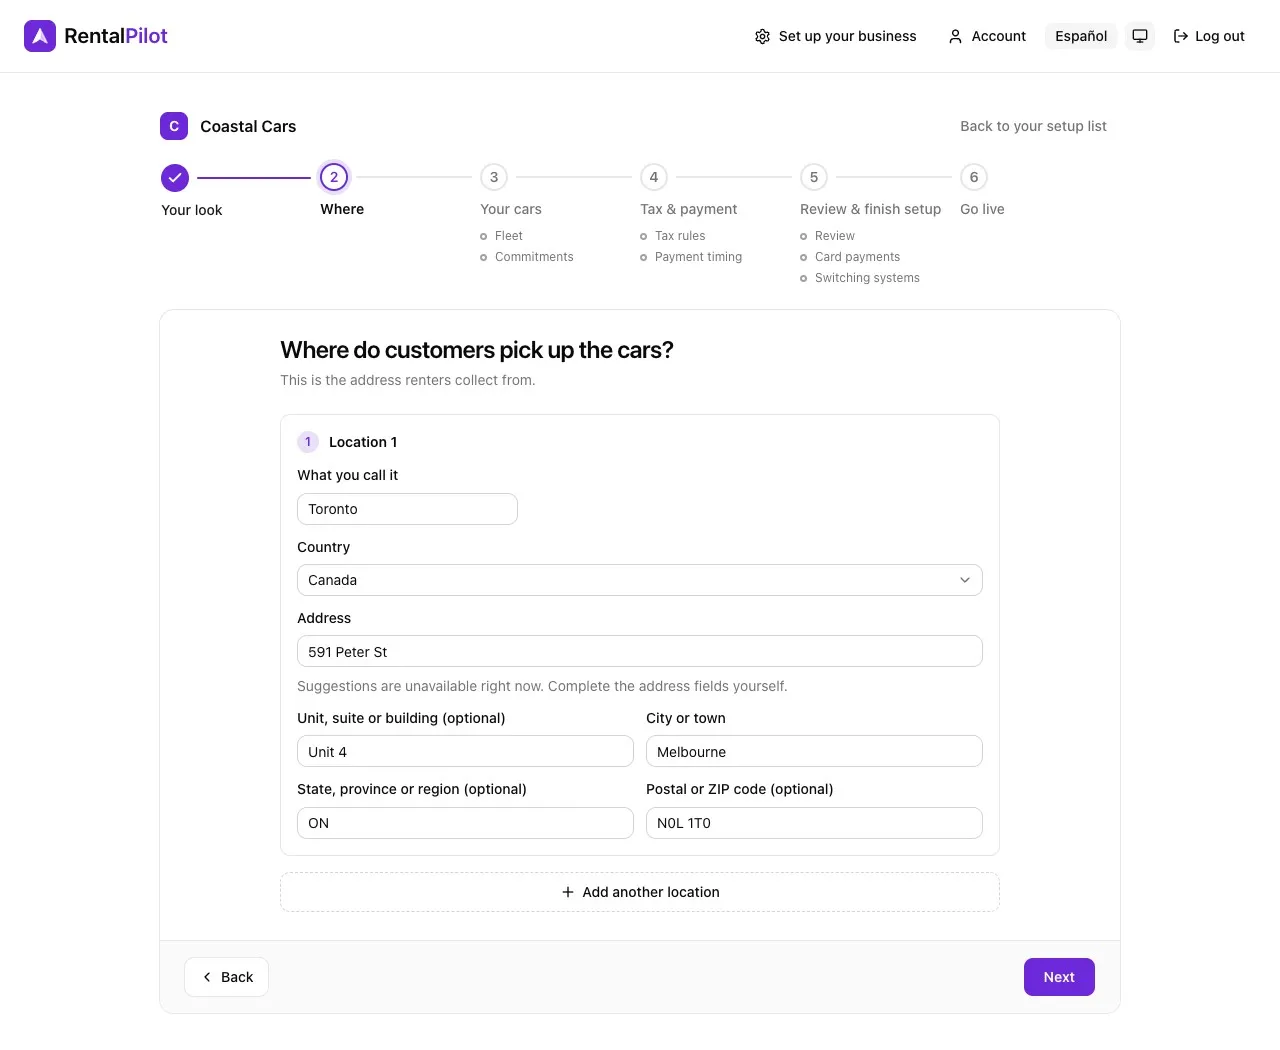
Where customers pick up. If your website listed your locations, they are already here, numbered and each named after its town. Change anything that’s wrong, Remove any that aren’t pick-up points, and choose That’s right. Otherwise your first location is named after your town and starts with the country, province or state selected at sign-up. Start typing its street address: suggestions favour the city you gave at sign-up. New accounts can save branches in Canada or the United States; existing businesses keep their previously supported locations. As you type the street address, RentalPilot suggests matching CA/US addresses and shows Finding addresses… while it searches. Pick a match to fill in the unit, city, province or state, and postal or ZIP code, then correct any field you need. Every part of the address is on screen from the start: street, unit, city, province or state, and postal or ZIP code. Pick a suggestion and every box fills in; if there’s no match, just fill the boxes in yourself. A new account needs the province or state, street, city, and a valid Canadian postal code or US ZIP code before this step saves; unmatched raw search text is not stored as an address. Use Add another location for each extra branch; every plan includes as many as you need. Any location can be removed while there is more than one, and the list renumbers.
Your cars. Drop a spreadsheet (see below), or choose I haven’t got a spreadsheet and add them one by one: add a photo of the VIN sticker on the driver’s door frame or type the VIN, and we suggest the year, make, model and trim for you to review. A typed VIN is looked up as soon as it’s complete. The barcode image is read on your device and is not saved or uploaded. We do not add vehicle photos from the VIN. Without a VIN, choose Add more cars without a VIN (or I haven’t got the VIN): a new row opens on the list and you pick its year, make and model from lists in the row itself, or type them if the lists don’t have your car.
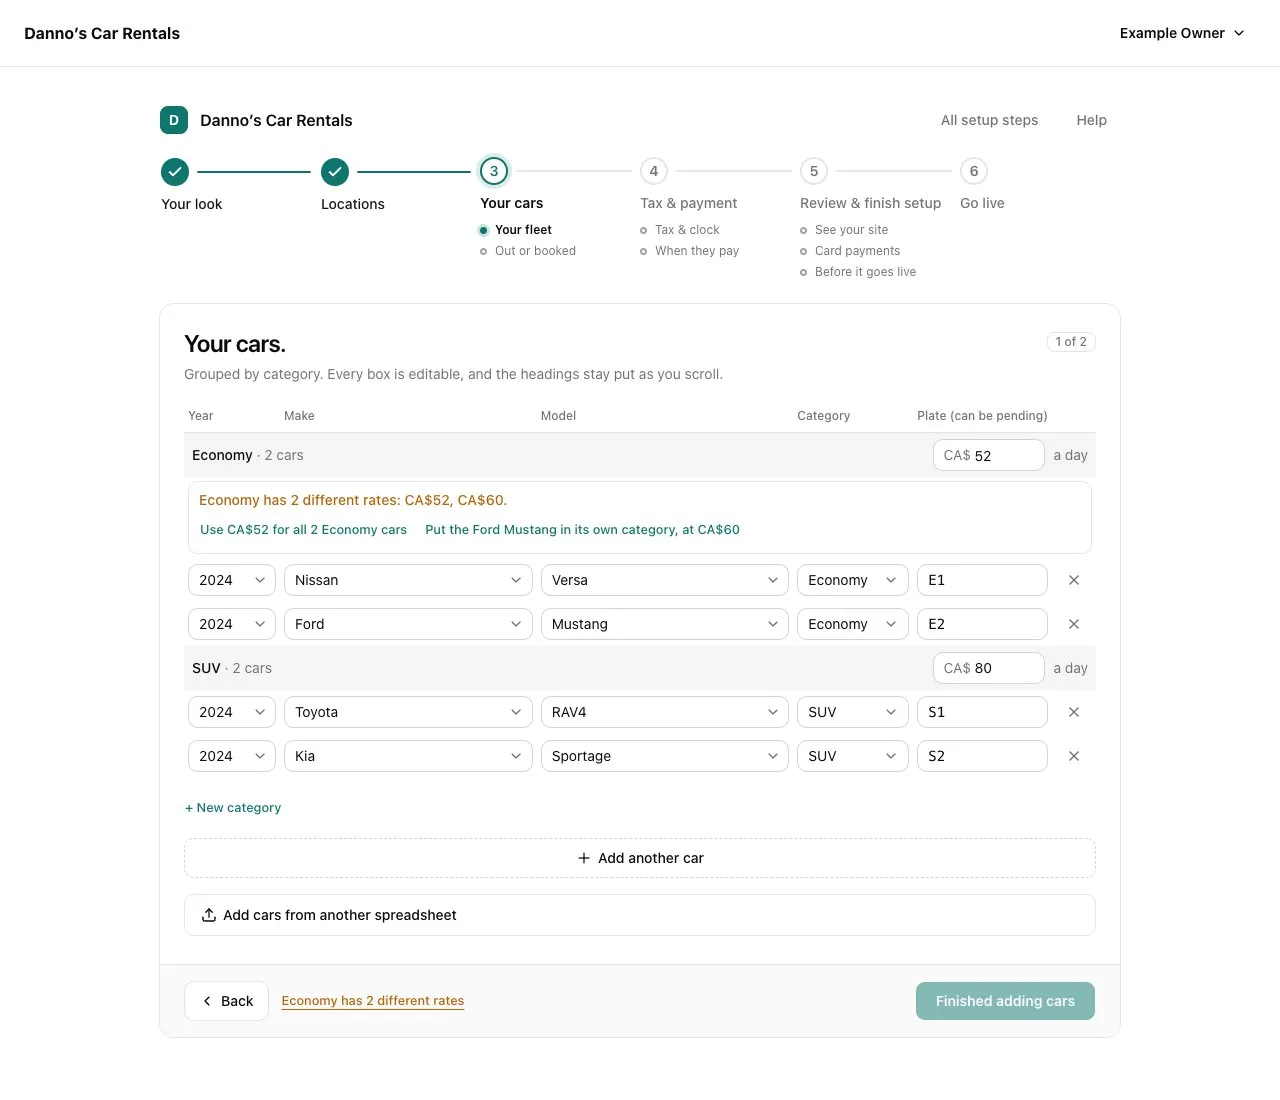
Every car you add becomes a line on the list (year, make, model, category and plate), grouped under its category, and every box can be edited. Each category’s heading shows its name, how many cars it has, and its daily rate, in one box for the whole category; there is no rate on the car lines. On a phone, each car becomes a labelled card with the same fields and controls, so nothing is hidden off-screen. A new car starts blank, so pick its category; if it isn’t there yet, choose + New category in the category box, or use + New category under the list, then give the category its rate once a car is in it. Renters book a category at one base daily price per category; the photo and model are examples, and you assign the specific car at pick-up. If your spreadsheet has different rates in one category, the question appears under that category’s heading, and a counter such as Economy has 3 different rates takes you there. It offers two fixes: Use $49 for all 5 Economy cars, or put the differently priced car in a category of its own. See Book a rental by category for the renter’s booking steps and driver checks.
The bar at the foot of the screen calls out anything missing. A missing daily rate or location must be fixed before you continue. A car whose plate hasn’t arrived can be marked Plates not here yet; those cars are grouped under waiting for plates, which you can show or hide. A pending plate means the car still counts toward your plan and must have a location, but renters cannot see or book it and staff cannot assign it until you add the plate. This means a new fleet can finish setup and publish even when every plate is still pending. A car you don’t want can be taken off the list with Take off the list. With more than one location, each line also asks where the car is kept, and Add cars from another spreadsheet stays under the list for the rest of your fleet.
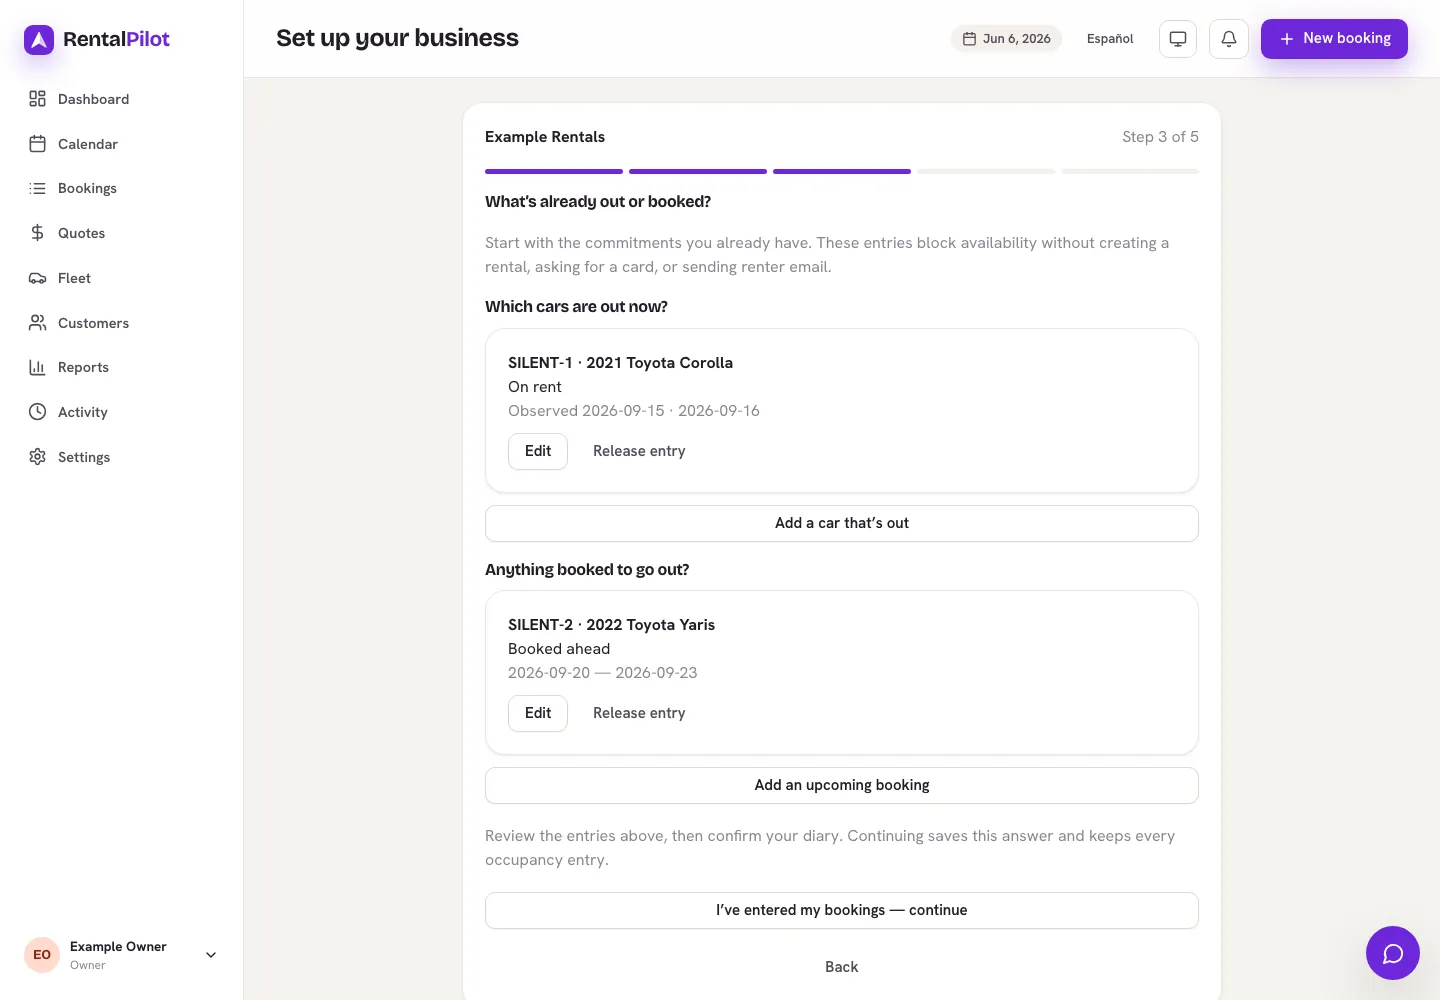
What’s already out or booked. If the workbook you dropped for your cars has a bookings sheet, it’s read here straight away; a rental-history sheet with the same columns comes along too, and its past rentals are listed as already ended rather than added. If there are more than 1,000 rows in all, rentals with a return date before today are left out instead, except when the sheet still says the car is out (for example Out, On rent or Overdue). Those rows and cars with no return date are kept so you can answer what is happening now. Cancelled bookings are always left out. Otherwise we first ask for a bookings spreadsheet (CSV or Excel .xlsx) with each available car’s plate or VIN and its dates; a column for who each booking is for is read too. Cars whose plates are still pending stay out of this step until you add their plates. Choose I haven’t got one to fill it in by hand. Either way you get your available car list again, with four more columns:
- Status: Ready to rent, Out for rent or Off the road. Nothing is out unless you say so.
- Until: a car out for rent needs its return date. A car off the road can say don’t know.
- Available at (only if you have more than one location): where the car will be when it’s next free. Pick one on each line; there’s no default.
- Booked: bookings already in your diary, listed under their car with the dates and who they’re for. Use + add or + add a booking to enter one.
You can also drop a separate bookings CSV alongside your fleet files on the first screen. After Finished adding cars, those bookings appear here without uploading the file again. Returning to an earlier setup step keeps your saved answers; a newly dropped bookings file is still checked and brought into this list.
If the sheet says a car is still out but its return date has passed, Still out? This return date has passed asks when it is now due back. Enter the new date under Until, or choose It’s back if it has returned. The counter 1 car still out past its return date takes you to the question, and Continue waits for your answer. Until then, the car remains unavailable for future bookings, including bookings by category, even if you leave setup and return later. Any later bookings from the same sheet stay listed for review. Changing the car to Off the road keeps it unavailable until you give a return date or mark it ready. The same question appears when you recheck the calendar before switching booking systems.
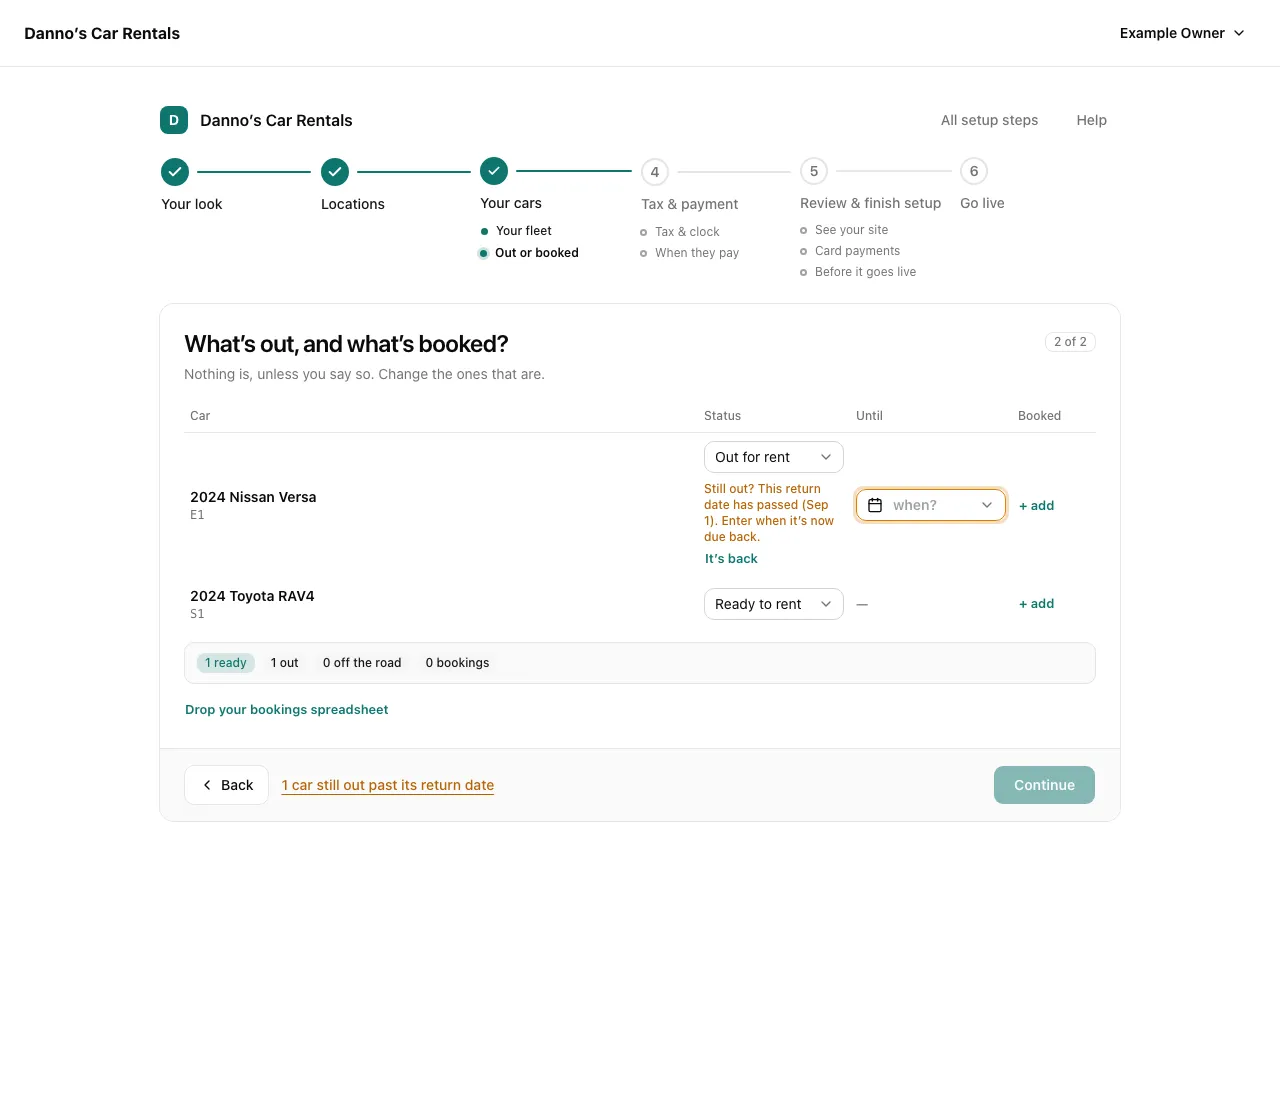
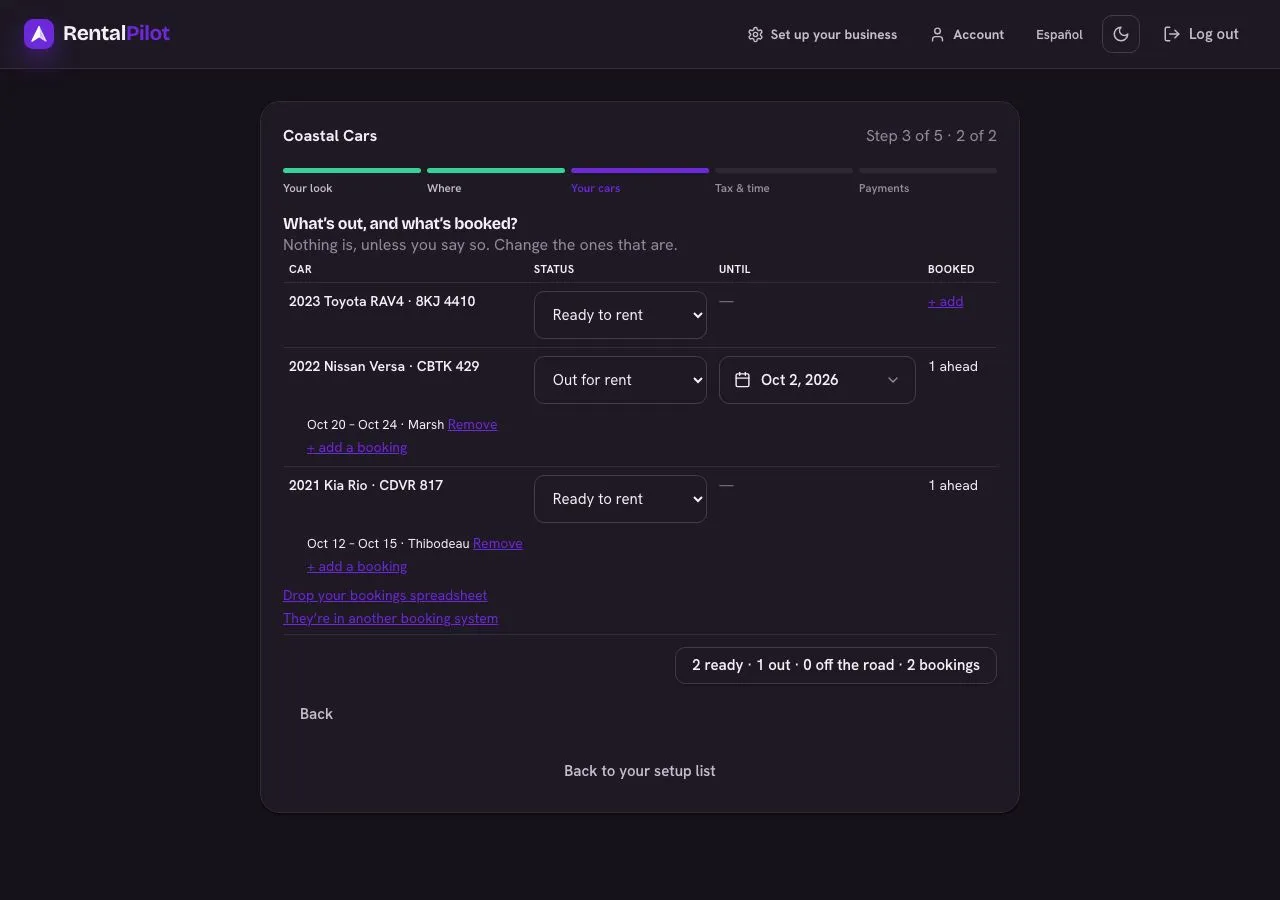
The live tally at the foot of the screen says what you’re confirming, for example 17 ready · 1 out · 1 off the road · 1 booking, and changes as you edit. Choose Continue when it is right. Counters beside it, such as 1 car out with no return date, show what’s left to fill in. On a phone, each car is a labelled card with its status, return date, location and bookings visible. If your bookings live in another booking system, export them from it and drop the file here; whether you’re switching from it is asked at the end of setup. Nothing is emailed to renters and nothing is charged.
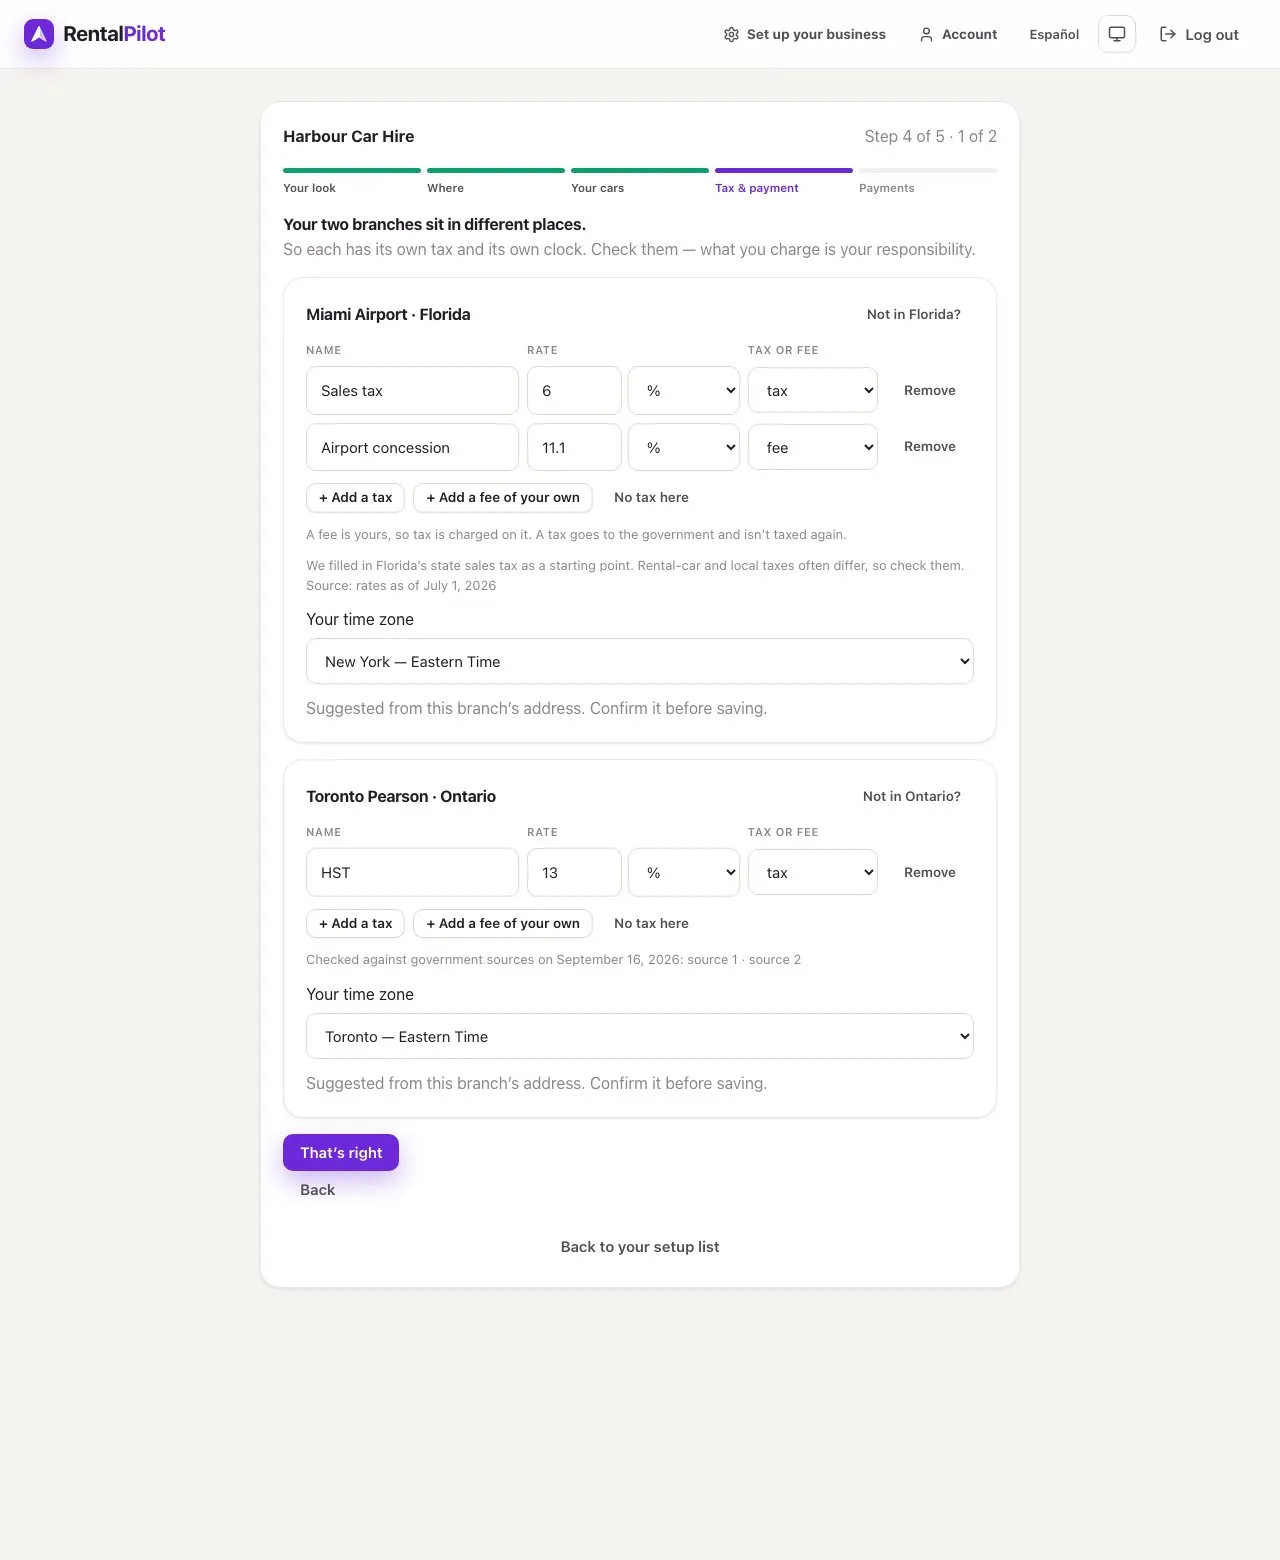
Tax and time. RentalPilot reads each branch’s tax and time zone from its address. With one branch, you see one list and one time zone, for example Does this look right for Ontario? with HST 13%. With more, each branch has its own list and its own time zone, even in the same town, because an airport desk can charge a fee the town lot doesn’t, and US city and county taxes differ. If we placed a branch wrong, choose Not in Ontario? (or wherever we said) and pick the right state or province. Each line has Name, Rate, Unit (% or your currency per day) and Tax or fee labels, including on a phone; rates keep their full saved precision. A tax goes to the government and isn’t taxed again; a fee is yours, so tax is charged on it. Change any line, Remove one, or use + Add a tax and + Add a fee of your own. No tax on rentals here (or No tax here on one branch) clears the list, and you still confirm the time zone. In Canada we fill in the taxes we’ve checked; in British Columbia, Manitoba and Saskatchewan we fill in the GST and you add the provincial tax. In the US we start from the state’s general sales-tax rate, and rental-car and local taxes often differ, so check them: what you charge is your responsibility. One That’s right saves every branch. For a new business, distances follow your country, kilometres in Canada and miles in the US; you can change that in Settings → Pricing & catalog.
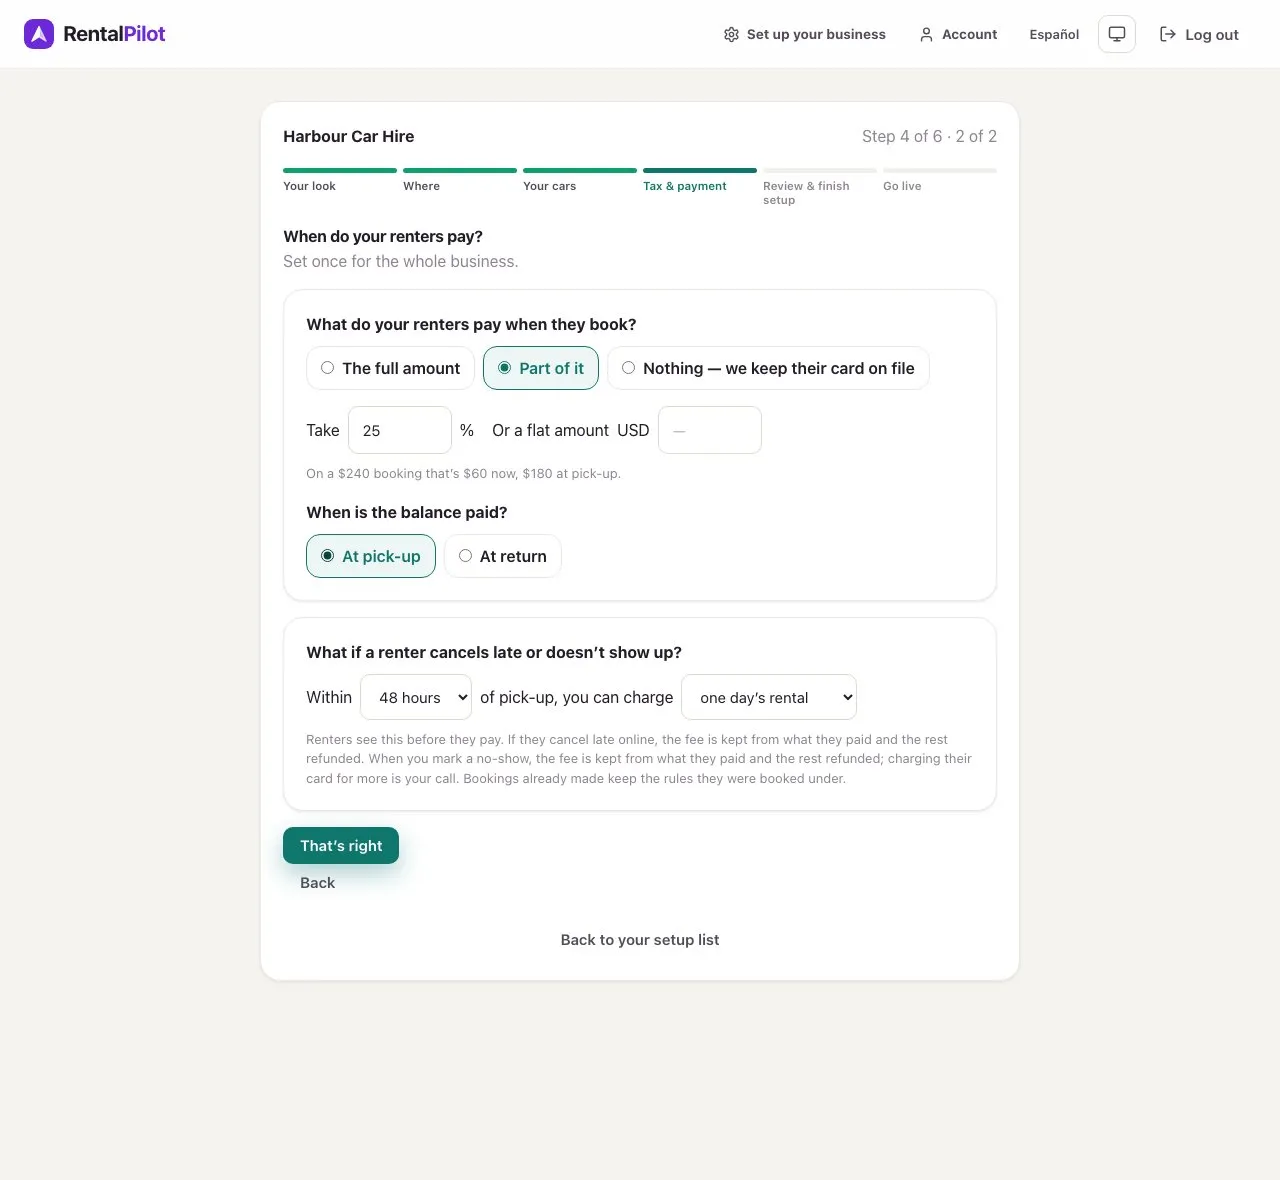
When renters pay. The second half of step 4 asks, once for the whole business, What do your renters pay when they book? The full amount, Part of it (a percentage, 25% to start with, or a flat amount), or Nothing — we keep their card on file. Nothing is chosen until you choose. With part of it or nothing, When is the balance paid? asks At pick-up (collected at check-out) or At return (collected at check-in); it has no default either, and choosing the full amount again clears it. That’s right stays grey until every question showing is answered. Then What if a renter cancels late or doesn’t show up? Choose how close to pick-up (24, 48 or 72 hours, or 7 days) and what you can charge: one day’s rental, two days’, the whole booking or a set amount. It starts at 48 hours and one day’s rental. Renters see this rule before they book. If they cancel late online, the fee is kept from what they paid and the rest refunded. Change either answer later in Settings → Reservations, where the window can be any number of hours. Bookings already made keep the rules they were booked under.
Setup remembers where you were. When you come back, you land where you left off, on the first screen with a question still open; Back to your setup list shows all six stages and what is left to do. If the same setup is changed in another tab or device, RentalPilot refuses the stale save and asks you to refresh instead of silently overwriting the newer answer. Changing a finished stage sends you forward through the affected review again.
The setup flow keeps the dashboard, calendar and other operating screens out of the way. The top bar shows your business name, which brings you back to setup, and your own name, which opens Your account and Log out. Your account shows your name, email and how you sign in, with Change password and two-factor authentication if you sign in with a password, plus our support address and Copy. Back to setup returns you. Your plan, card payments and staff appear there after go-live. If your account requires multi-factor authentication, complete that security step before continuing.
Bring your fleet from a spreadsheet
Drop a CSV, Excel .xlsx, PDF, PNG or JPG file onto the fleet step, or choose several files together. RentalPilot reads each file and names the sheet or page it is checking as it works; completed rows in a file still being read appear in a read-only preview. That file enters your editable list only after its final check, while other finished files can be reviewed sooner. If a workbook is password protected, enter its password there once to open it. The password is not kept with your setup. If a file still cannot be read, Send it to us opens an email for you to attach it, and you can carry on with another file or by hand. Add cars from another file adds to the list rather than replacing it.
You don’t pick a sheet: current cars fill your editable list, cars marked as sold are set aside for you to confirm, service and one-time costs follow their cars, running costs are kept for later review, and bookings go to the next screen. The file name, sheet or page, and original position help you check an uncertain reading. For a photo, look at the original image and check each proposed row before choosing Use checked rows. Unchecked rows are not added. A PDF also needs your review before you finish. If your cars are split one sheet per lot with no location column, each sheet’s name can suggest the matching location; check it before saving. For an older .xls file, save it as .xlsx or CSV first.
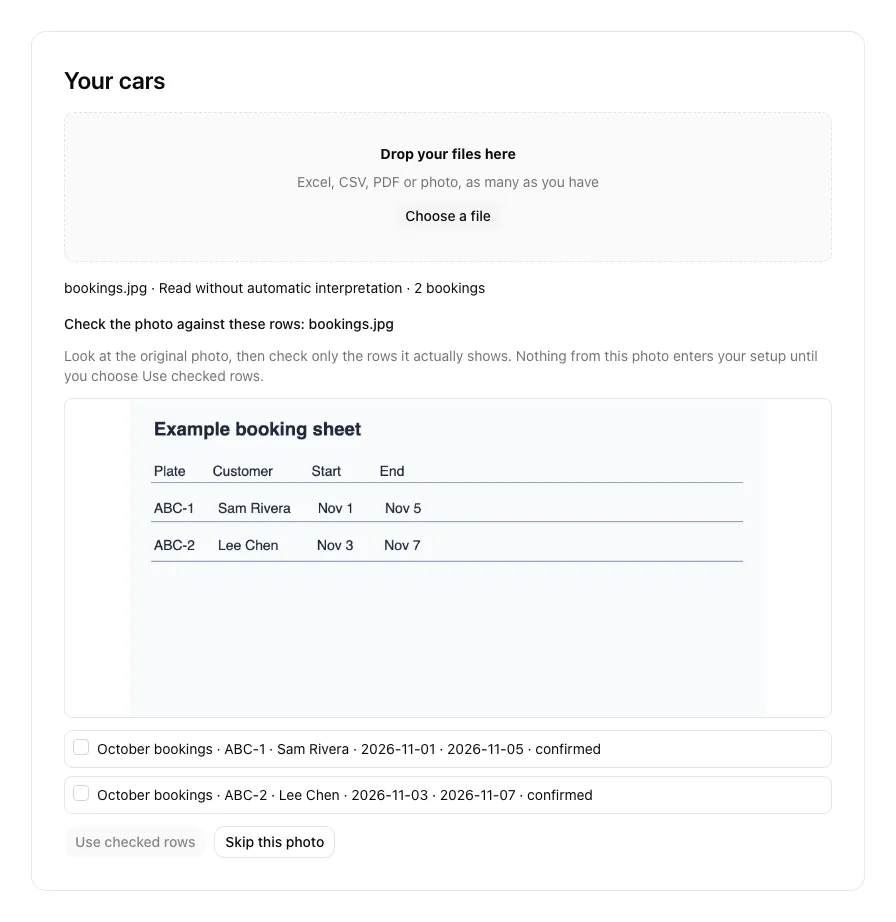
If an image has no rows to review, We couldn’t find any fleet or booking information in this image appears with its filename. Choose Skip this photo to continue, or try another file.
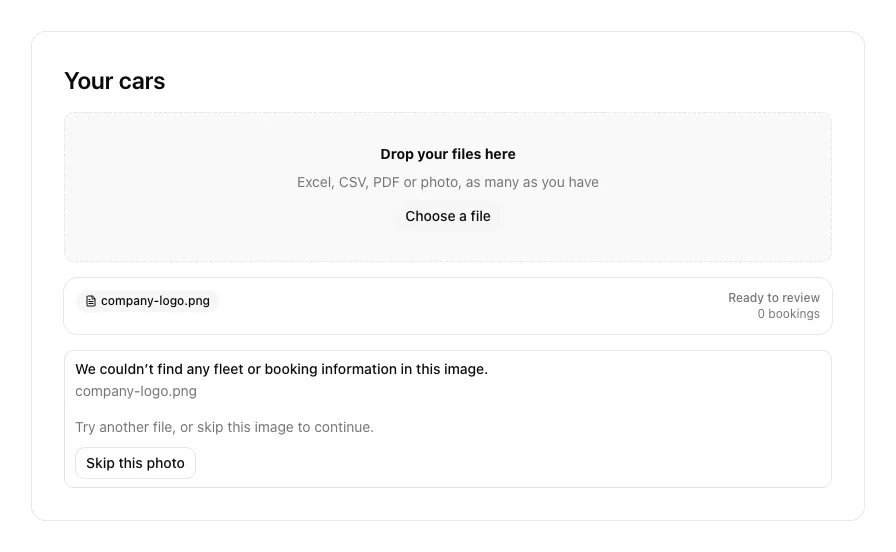
Keep your original files. Their interpreted review data remains a draft until you choose Finished adding cars; the original files are not an archive on your account.
Some source sheets, such as customer lists and running costs, are kept with setup for later review. If those sheets exceed 100 in number, 200,000 characters in one sheet or 750 KB altogether, Finished adding cars pauses and shows each source sheet with Remove source. Remove only sheets you do not need to keep; cars and results from other files stay in your list. A removed source sheet will not be available after this step, so keep its original file. Service rows in a later file can still find a car from an earlier file by its unit number.
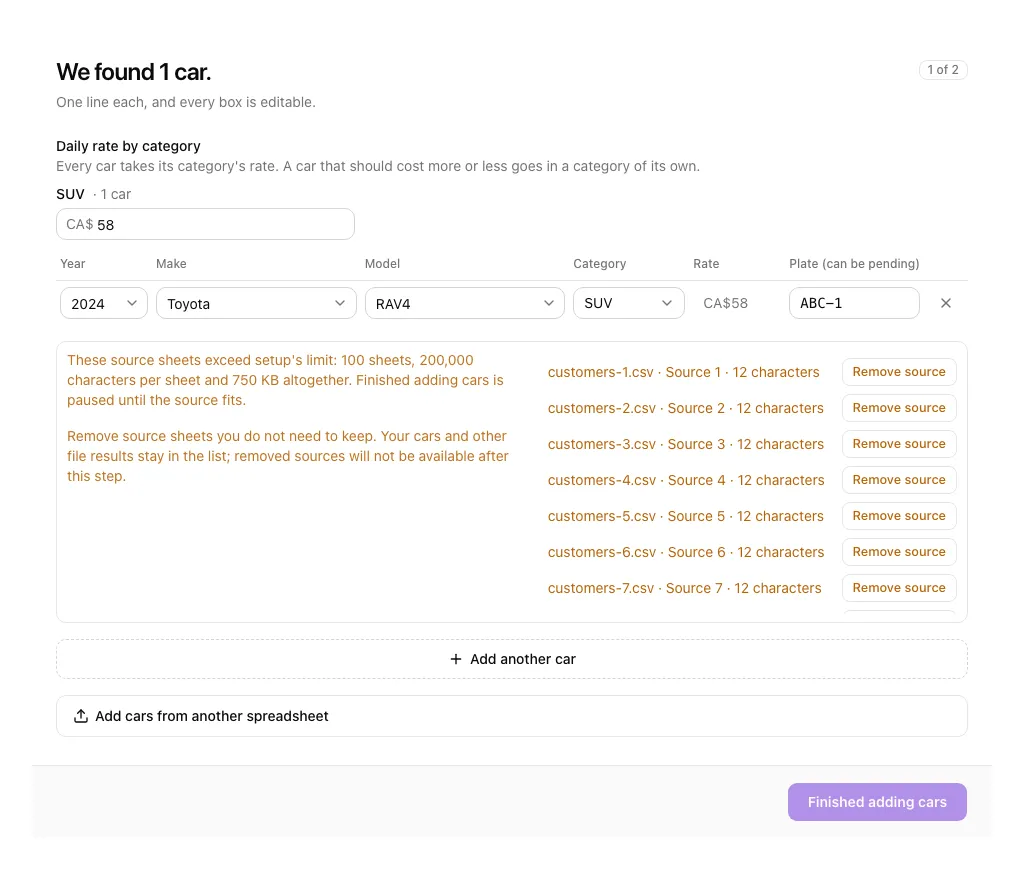
Even when the source sheets fit their limits, the cars and imported history together can make the setup request too large. Finished adding cars then pauses with a message; remove source sheets you do not need, or reduce cars and their imported history, keeping the original files. An unsaved draft field larger than 250 KB may not survive a reload, so keep the original file to upload again if needed.
Familiar column names are matched automatically, such as Type for category, Daily $ for rate, Lot or Yard for location, and Odometer or Kms. The cars land straight in the editable list above, so you fix a rate or a plate right there; there is no separate review screen. That review list is kept as a draft; the cars and their imported history are added to your fleet only when Finished adding cars succeeds. Add any cars that weren’t in the sheet with + Add another car.
Cars on a sold-cars sheet appear under may no longer have. Choose I still have this one to put a car back on the list. Cars left there are taken off your fleet when you finish; their history is kept. Cars you’ve already added stay on the list even if the workbook doesn’t mention them, and a car the workbook names by plate or VIN is updated rather than added twice.
Service and cost history. Each row on a service or cost sheet is attached to the car it names, by plate, VIN or year, make and model, and saved with your fleet. A row that can’t be matched to exactly one car, or whose amount or date can’t be read, is left out, and the screen says how many rows were saved and how many were left out. Dates should be Excel date cells or written as 2026-01-15. A row with no date takes the latest date found anywhere in the workbook (dates in the future don’t count), or the day you import if there isn’t one; a row dated in the future is left out. On the car’s page, imported history shows the file, sheet and row it came from and how its date was worked out. It counts toward costs in Reports but not toward the number of services. You can correct an imported date later; the record notes that it was corrected.
See Import your data from a spreadsheet for importing customers and vehicles after setup.
Bookings files use the same reader. When you drop or choose a CSV or Excel .xlsx for bookings, add another bookings file, or upload your final export while switching systems, RentalPilot sends the file to the setup reader. When AI reading is available, it interprets the file and checks the results against its source. All identified bookings tabs are combined, even when the first tab contains something else. Wait for reading to finish, then check the bookings in the list or review table before continuing. Cancelled bookings are left out, and Excel dates keep their calendar day.
If the complete file cannot be read safely, it is not treated as an empty calendar or a complete replacement for your old diary. Try another export, enter the bookings yourself, or use Send it to us where offered. An unavailable AI service can use the server’s existing spreadsheet fallback; it is not an AI-verified result. Confirm your email before uploading files for reading.
2. Review what you entered
Step 5, Review & finish setup, starts by showing you what you built: your cars, what is out right now, your branches, whether every car has a rate, and that you are not live yet.
- See your booking site opens your real booking site, as renters will see it, in a window with its address on top. Switch between A computer and A phone to see both. Nothing on it books or charges until you go live.
- See your app shows your own Today as you will run it: your logo and colour down the side, the pick-ups and returns from what you told us is out and booked, in date order, and your cars with whether each is ready or out.
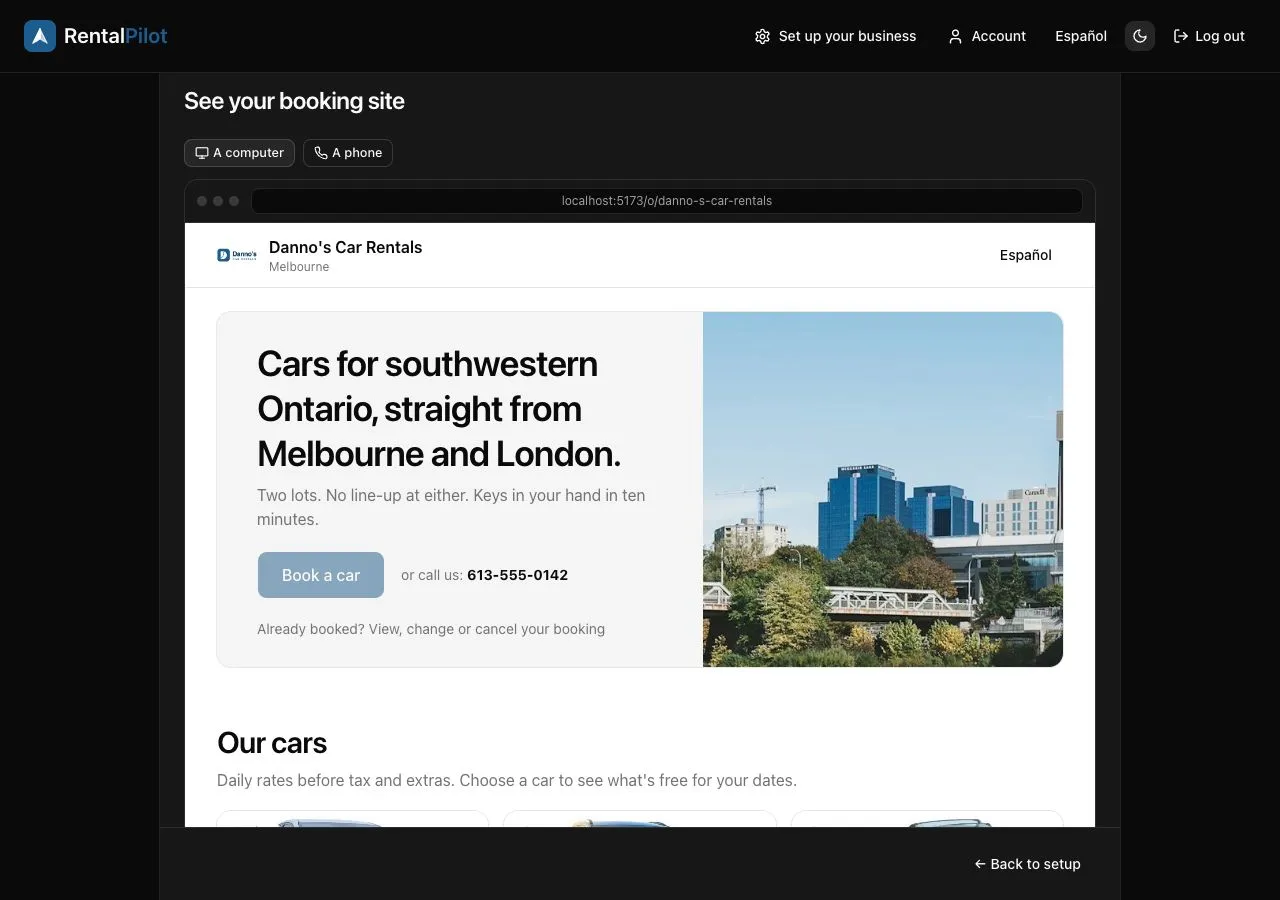
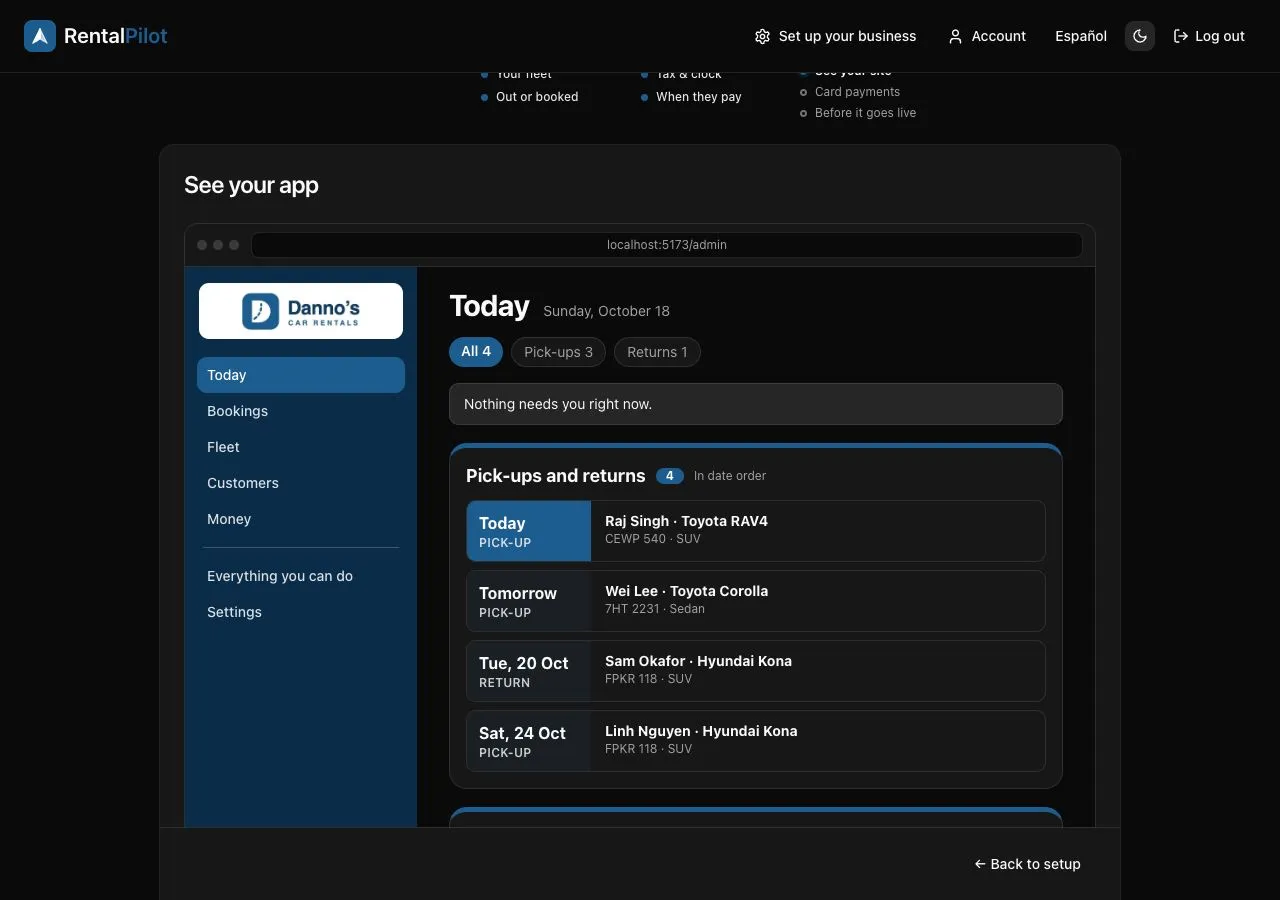
Each opens a read-only preview, and ← Back to setup brings you back. Nothing is public, and neither preview creates a reservation or charges anyone.
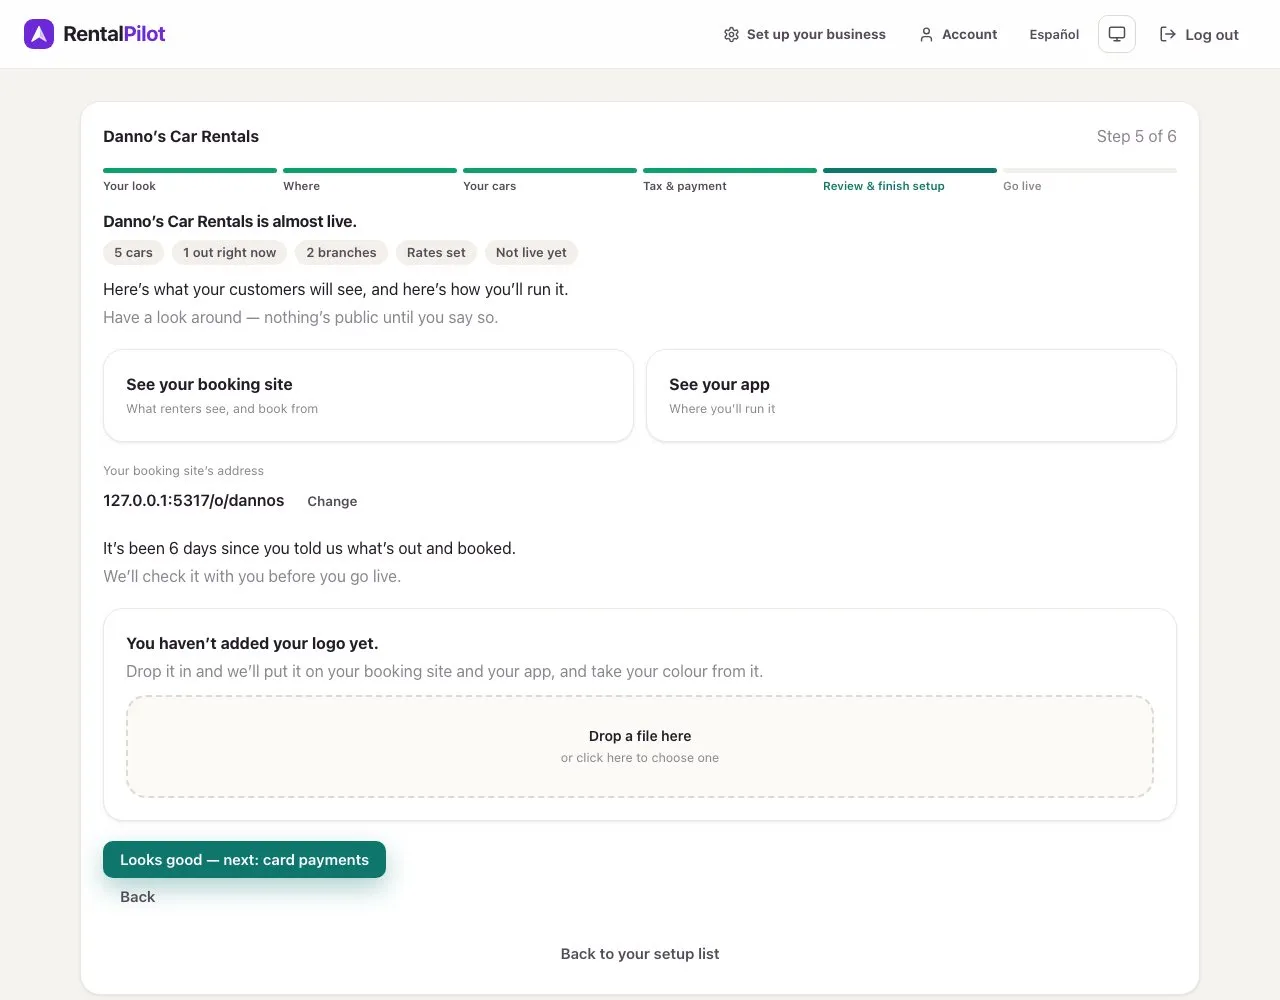
The screen also shows your booking site’s address. It’s made from your business name, so if it came out long or odd, choose Change and pick another while nothing is public yet; you’ll see straight away whether it’s free. An address you’ve used keeps working and forwards to the new one, and nobody else can ever take it. If you told us what is out and booked on an earlier day, it says how long ago, and your calendar is checked with you before you go live. If you chose I’ll add one later for your logo at step 1, you can drop it in here; your colour is taken from it and shown as a swatch you can change.
Return to the relevant setup question to make a correction. Your saved answers remain available when you sign in again. When it looks right, choose Looks good — next: card payments.
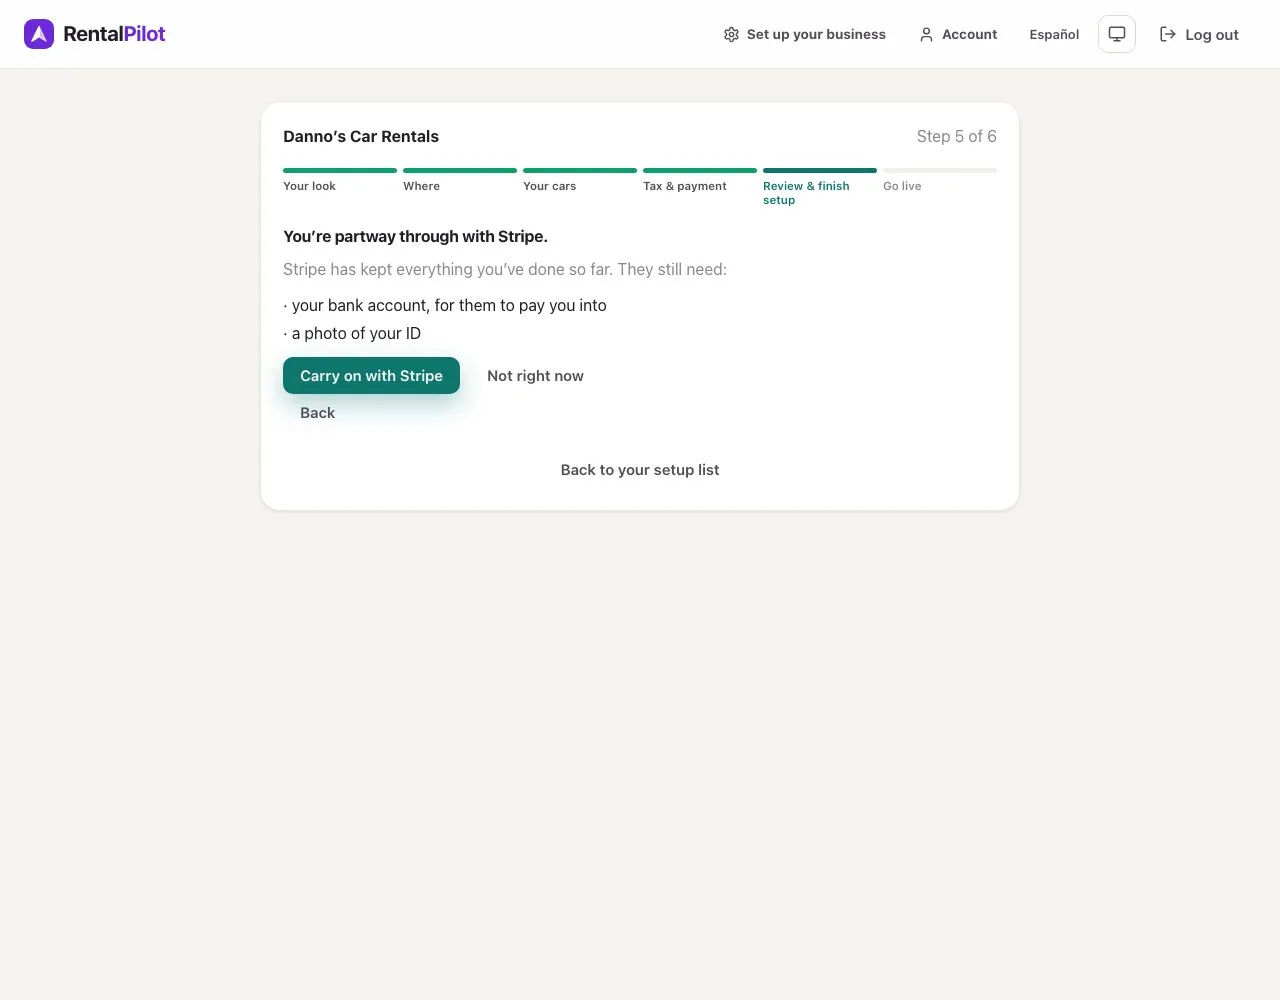
Card payments. Stripe moves the money, straight into your own bank account. If you already use Stripe it’s a sign-in; if not, Stripe sets you up in about ten minutes. Choose Not right now to go back to the review and finish it later. If card payments are already set up, this screen is skipped.
When you come back, the screen matches where your Stripe account is now:
- You’re partway through with Stripe lists what Stripe still needs, such as your bank account or a photo of your ID. Carry on with Stripe picks up where you left off.
- Stripe is checking your details usually takes a few minutes, sometimes a day or two. Check again, or Look around while you wait; we email you the moment Stripe is done.
- If Stripe has paused card payments on the account for another reason, the screen says so and points you to your Stripe dashboard. Waiting won’t fix it, but it moves on once Stripe lifts it.
- If Stripe declines the account, the screen says so. Card payments can’t be set up and the site can’t go live, and you won’t have paid us anything.
Before it goes live. Everything a renter can book against has to be right on the day your site goes public, so the last part of step 5 checks it:
- Are you replacing another booking system? Choose Yes — we’re switching from it if renters book with another system today (a website of its own, or a button on yours), or No — we don’t have one. If you also list cars on a marketplace such as Turo, or take enquiries by email, the answer is No.
- If you’re switching, Pause it, then bring your bookings across. First turn off online booking in your old system (in its settings; we can’t reach it) and tick It’s paused. From then on renters can’t book online anywhere until you go live, a few minutes later. Then download your bookings from it again and drop the file in. It’s read with the same columns as your first file, so there’s nothing to answer. We read your file again then shows your cars with only the changes marked: new bookings (Leave out if one shouldn’t be added), bookings with new dates (Keep the old ones to undo), and bookings not in your file any more — cancelled?, where you choose Keep it or Remove it. If the old system can’t export, choose It can’t export its bookings and check the same table by hand.
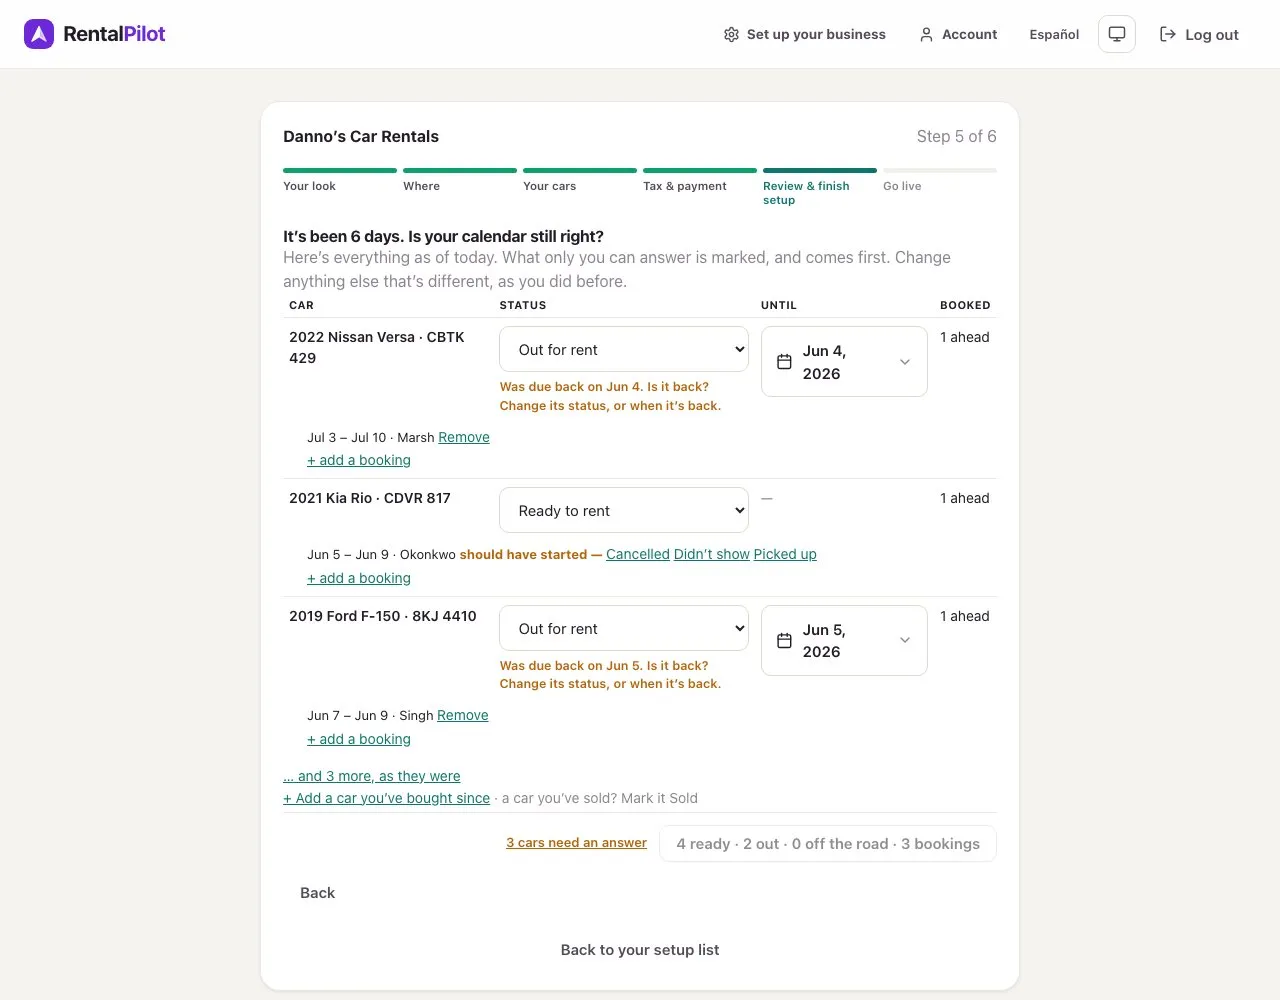
- If you told us what is out and booked on an earlier day, It’s been 6 days. Is your calendar still right? shows every car as of today, with what only you can answer marked and first: a car that was due back and hasn’t been marked back, a car out with no return date, a car off the road past its expected date, and a booking whose start date has passed (Cancelled, Didn’t show or Picked up). A booking that started and ended while you were away is taken as done.
- If an answer clashes with a booking, for example a car still out when its next renter picks it up, the booking is marked: Cancel it, Move it to another car in its category, or give a Free upgrade to a bigger one. Only cars free for those dates are offered. The button waits until every marked row is answered and every clash settled.
- You can also mark a car Sold (its bookings are moved or cancelled first) or + Add a car you’ve bought since.
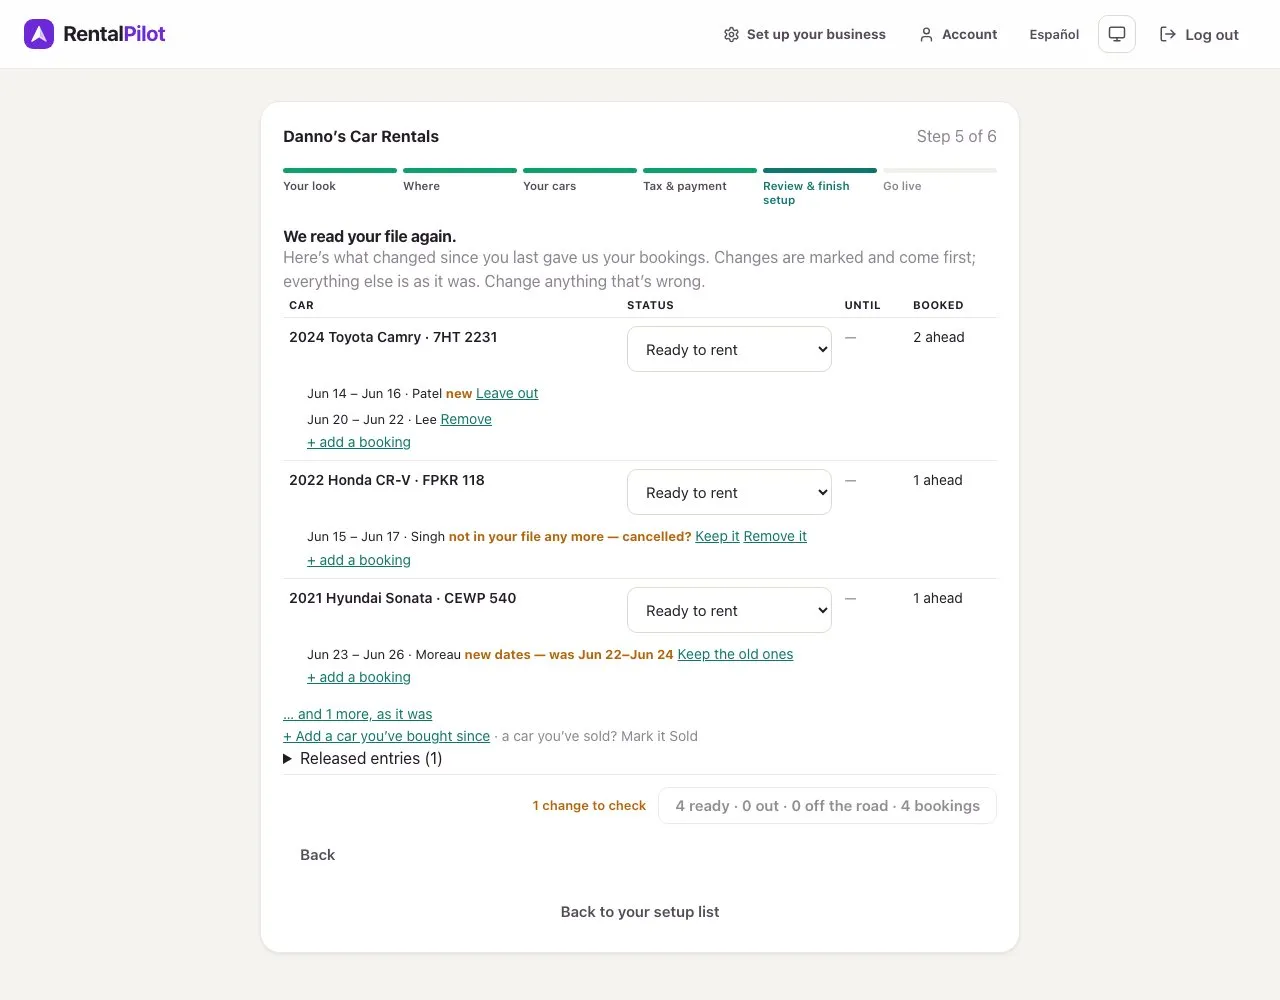
Going live is step 6, the last one.
3. Everything’s ready
Step 6 starts with one look at exactly what goes public: your booking site’s address, how many cars are bookable today, out or off the road, and how many bookings are ahead, the tax a renter pays, when renters pay, what a late cancellation or no-show costs, and the starting points we set for you — whether your rates change with the seasons, discounts for longer rentals, the damage deposit, mileage, one-way (with two or more locations), the time between rentals — and that card payments are on.
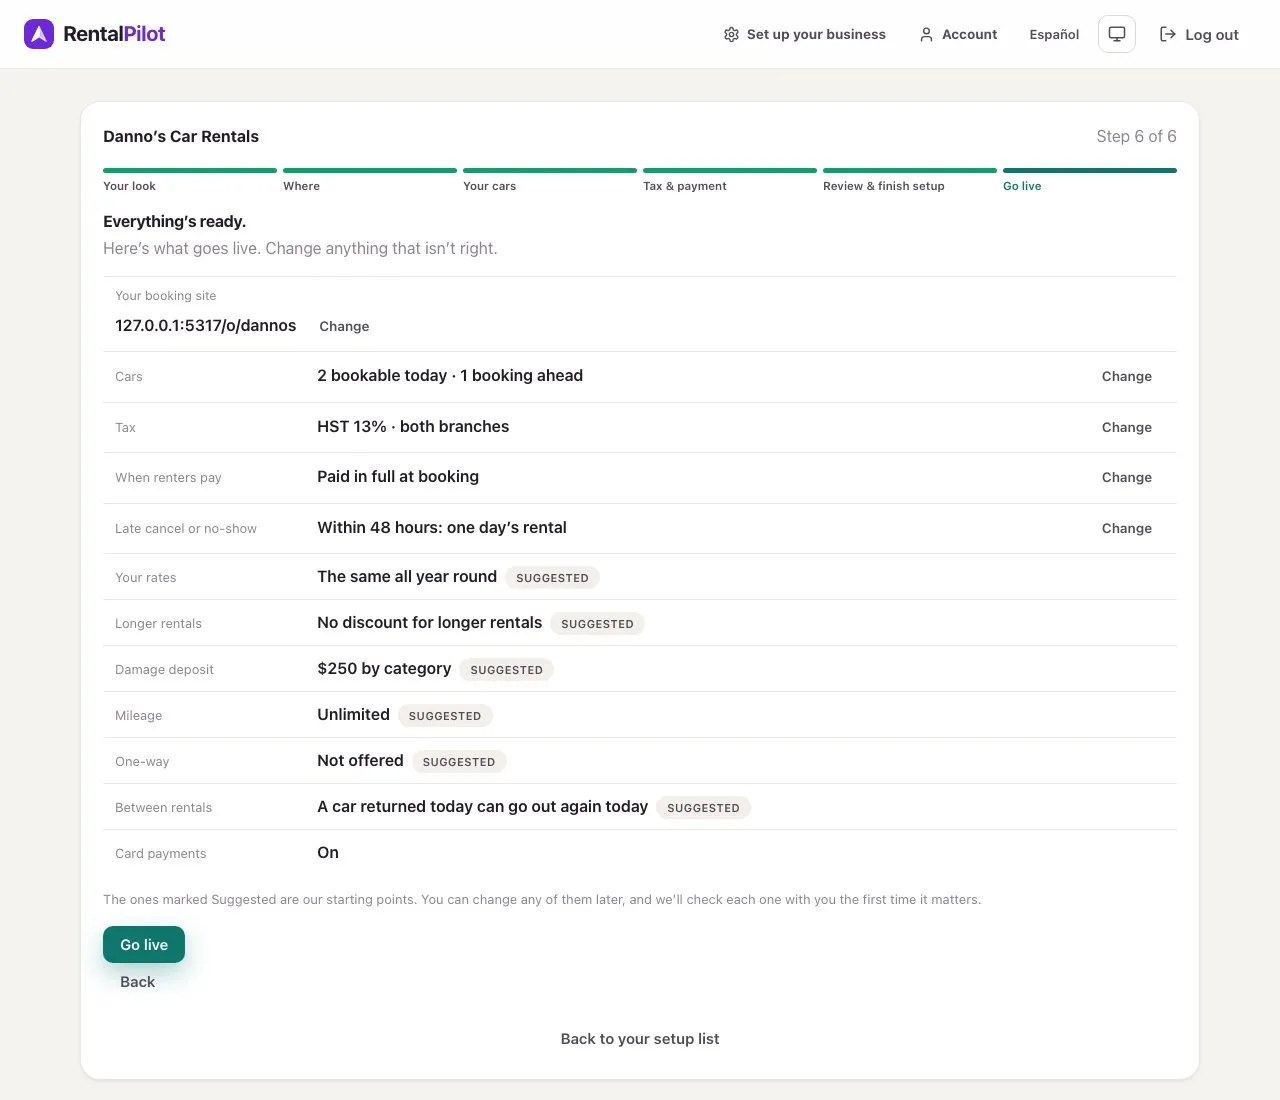
Your own answers each have Change: it opens the screen where you set it, whose button then reads Done — back to the summary, and if you changed nothing, you’re back here with that line highlighted. If you did change something, you go through the steps after it again before coming back here, so each one can check your change. Everything you entered is kept and filled in, so most of them are just a look and a tap. The lines marked Suggested are our starting points; you can change any of them later. Nothing here has to change to go live. When it’s right, choose Go live.
4. Your plan, and going live
Go live takes you to your plan, chosen from the size of your fleet — for example You’re on Growth, up to 20 cars with as many branches as you like — with its monthly price. If you’re buying more cars soon, See the other plans shows the bigger ones. Not happy in your first 30 days? We’ll give you your money back.
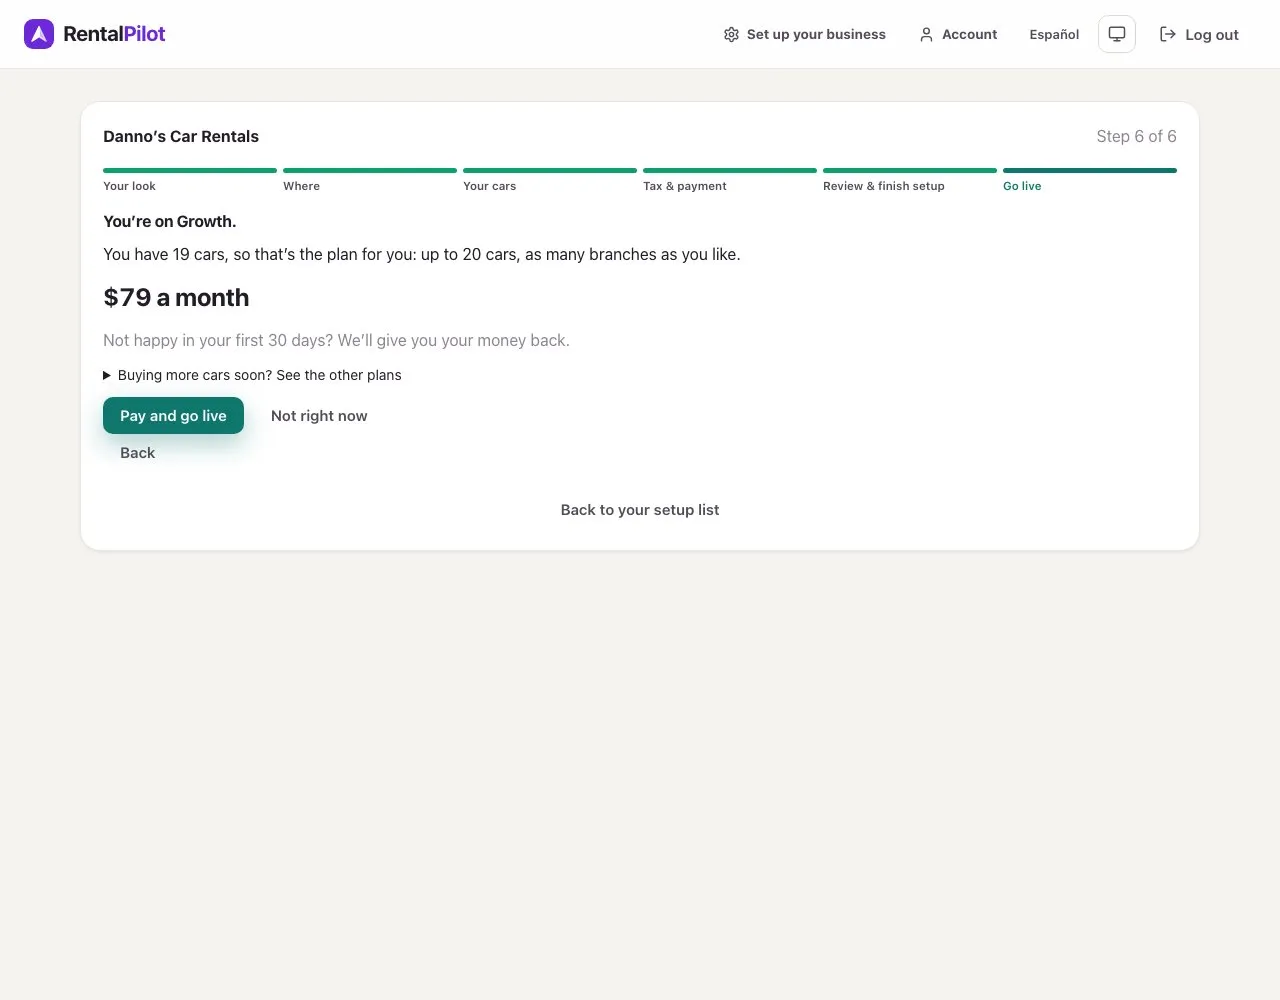
Pay and go live opens a secure checkout. The moment the payment goes through, your booking site goes live on the payment terms you saw on the summary — there’s nothing more to click. RentalPilot confirms the payment with the payment provider first; returning from checkout by itself does not. Not right now goes back to the review.
If a checkout is pending, use Check billing status or Continue existing checkout rather than starting a second purchase. If your fleet is over 100 cars, Ask for a price and we’ll answer within one business day; your site stays unpublished until the price is agreed.
5. If your site didn’t go live with the payment
If something publishing needs changed between choosing to pay and the payment going through — for example you changed when renters pay in another tab — your plan is still active and the site waits for you: Publish booking site publishes it on your current terms. Public reservations also need a branch address, a bookable real vehicle and working card payments. Your RentalPilot subscription and your Stripe connection for collecting renters’ payments are separate.
6. After you go live
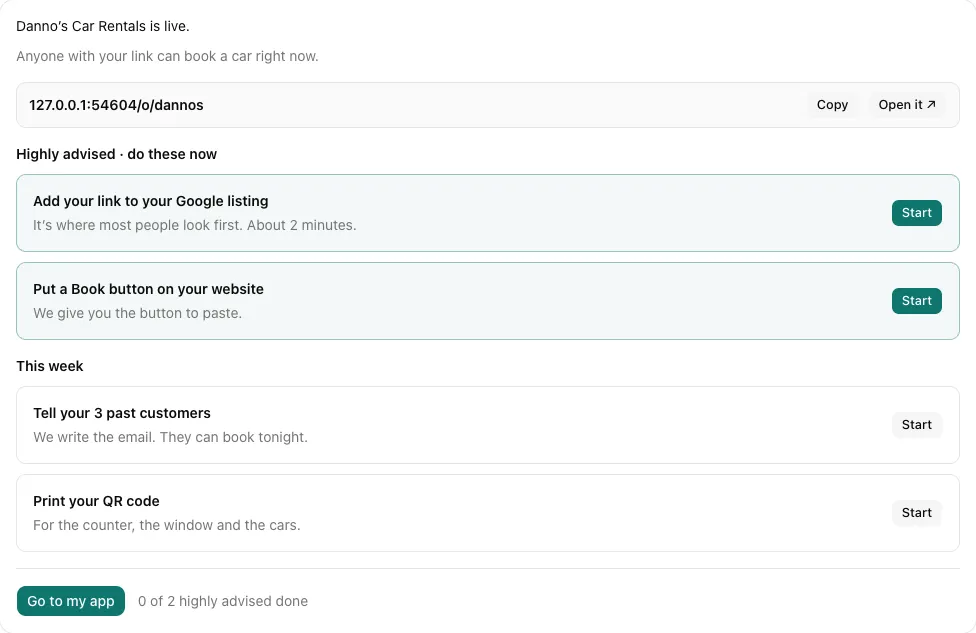
Your live screen shows how many cars can be booked today, whether card payments are on and how renters pay. Your booking link has Copy and Open it. The tasks below it are split into Highly advised · do these now and This week.
Choose Start on a task to open its walkthrough. Done saves your tick and returns to the list; while it is saving, wait for it to finish. If saving fails, the walkthrough stays open so you can retry. Finish later returns to the list with that task still undone. A skipped-logo walkthrough opens Booking site so you can upload it; its Done control stays unavailable until an uploaded logo actually removes the task. Opening settings alone does not complete it.
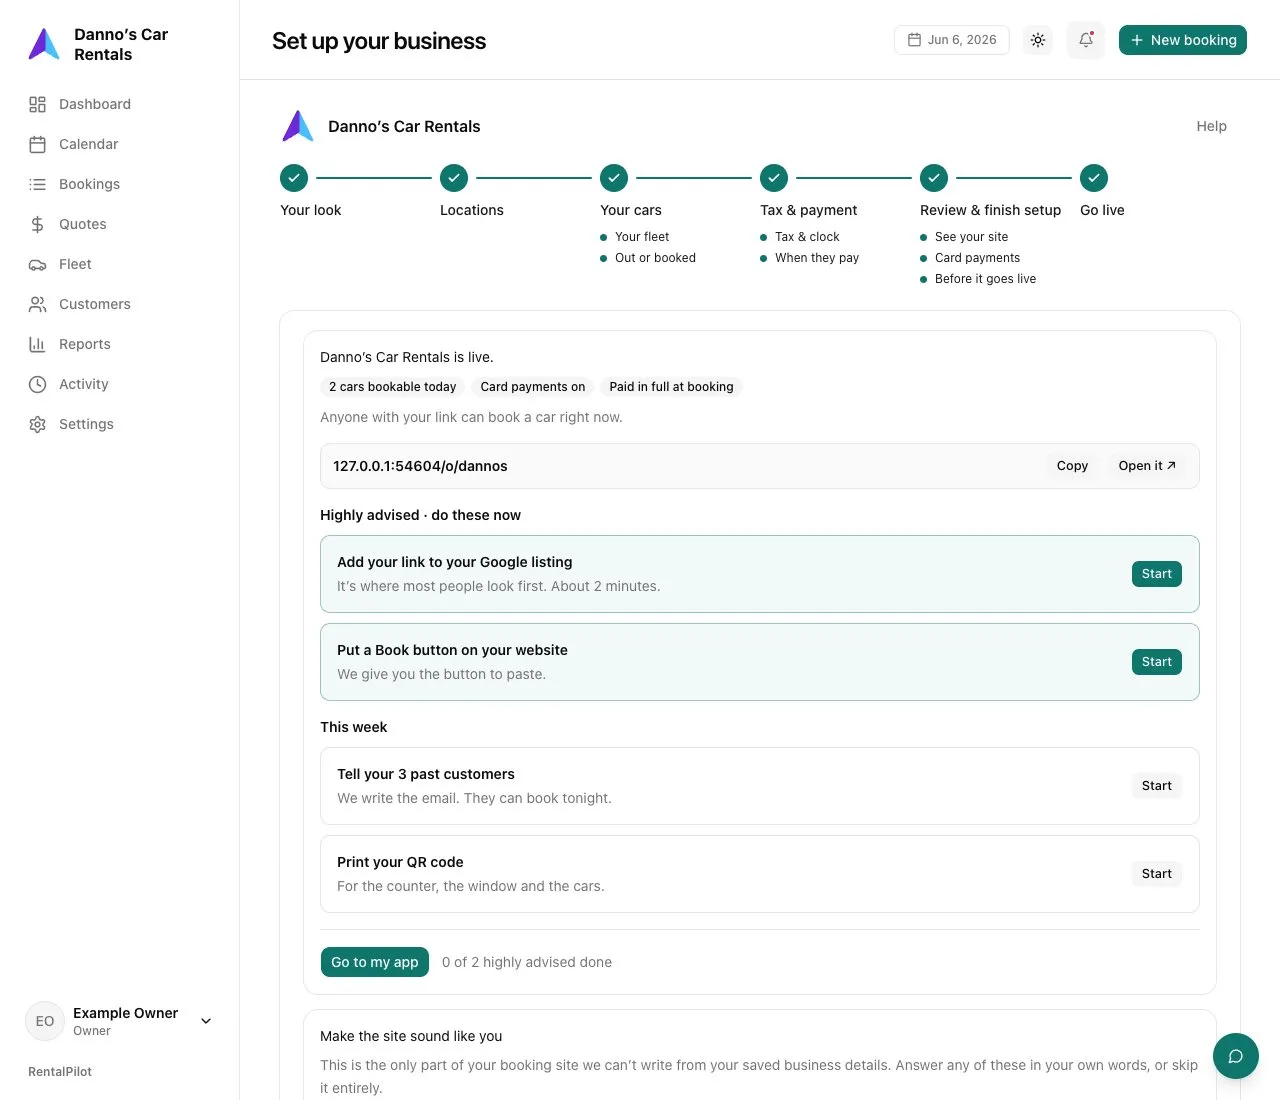
With a website of your own, adding your link to Google and putting a Book button on your website are highly advised. This week’s tasks include your customer announcement and QR code. When past renters or usable imported contacts are already saved, Tell your past customers opens an editable announcement with your booking link. Otherwise Got a list of past customers? gives you a draft to use with your own list. You can copy or download it, review it and send it yourself. RentalPilot never sends it.
Without a website of your own, Get your business on Google is highly advised. The customer announcement or list task, Make the address yours, Facebook and the QR code are in This week. Your booking site is your website; there is no website-code task. Using your own address is not ready yet; when it is, your current booking address will keep working. A skipped logo also appears in This week, before the QR code.
Go to my app is always available. If a highly advised task is still undone, Are you sure? names only what is left and explains why it matters. Go back and finish returns to the tasks; Go to my app anyway opens RentalPilot. Your site stays live either way. Once all highly advised tasks are done, the button reads You’re all set. Go to my app, even if this week’s tasks remain.
Things you left for later are on this screen too. If you skipped your logo, Add your logo is there. If some cars have no VIN, Add VINs for 3 cars is there as well. Setup doesn’t require VINs (a VIN is only a shortcut for adding a car), but a VIN identifies each car exactly, and recall notices and insurers ask for it. Review fleet takes you to the cars and leaves the reminder until the VINs are in. Don’t ask again removes it.

Whatever you leave undone waits on your dashboard. Open a row to return directly to its walkthrough, or mark it Done after doing it. Highly advised work always remains visible until it is truly done, even if it was removed in an older version. Only This week tasks can be removed with ×, after one confirmation; switching-system rows stay until they are done.
If a week after going live nobody has booked and you haven’t done any of them, we email you once to say that’s normal at the start, with the ways people most often find a new booking site. If you’re already sharing the link, you won’t get it.
Moving from another booking system? Replacing the link on your website and the link on Google is highly advised. If you do not have a website, only the Google link is required. Choose Start, replace the link, then mark the walkthrough Done. Cancel your old system is in This week and stays Locked on both this screen and the dashboard until the required link tasks are marked done. Then choose Start, follow the instructions to cancel with your old service and keep the file you exported, and choose Done in the walkthrough. You can choose Finish later without recording a cancellation.
If you confirmed that the old system is paused, the screen says so and warns that its old booking button cannot take bookings. Otherwise it explains that the old link still points to your previous system. Leaving with required links undone opens the same Are you sure? warning. While a paused system’s links remain unswapped, the banner across RentalPilot offers Swap them now to open the task and They’re swapped to mark the links done.
Existing accounts and interrupted subscriptions
Existing accounts retain their current plan terms and access; they are not silently moved to a different plan by this signup change. Your screens may therefore differ from the new-account setup flow.
If a previously paid account becomes restricted, access to view records and fulfill permitted existing rental obligations remains available. Starting new operations stays subject to the account’s payment and capacity requirements.
Need help with setup or billing? Contact us.